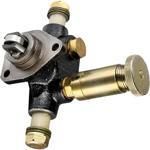
Information injection-pump assembly
BOSCH
9 400 611 576
9400611576
ZEXEL
101402-7590
1014027590
ISUZU
8972274400
8972274400
Rating:
Service parts 101402-7590 INJECTION-PUMP ASSEMBLY:
1.
_
5.
AUTOM. ADVANCE MECHANIS
6.
COUPLING PLATE
8.
_
9.
_
11.
Nozzle and Holder
8-97134-842-0
12.
Open Pre:MPa(Kqf/cm2)
18.1{185}
15.
NOZZLE SET
Cross reference number
BOSCH
9 400 611 576
9400611576
ZEXEL
101402-7590
1014027590
ISUZU
8972274400
8972274400
Zexel num
Bosch num
Firm num
Name
9 400 611 576
8972274400 ISUZU
INJECTION-PUMP ASSEMBLY
4BG1-T * K 14BC PE4A,5A, PE
4BG1-T * K 14BC PE4A,5A, PE
Calibration Data:
Adjustment conditions
Test oil
1404 Test oil ISO4113 or {SAEJ967d}
1404 Test oil ISO4113 or {SAEJ967d}
Test oil temperature
degC
40
40
45
Nozzle and nozzle holder
105780-8140
Bosch type code
EF8511/9A
Nozzle
105780-0000
Bosch type code
DN12SD12T
Nozzle holder
105780-2080
Bosch type code
EF8511/9
Opening pressure
MPa
17.2
Opening pressure
kgf/cm2
175
Injection pipe
Outer diameter - inner diameter - length (mm) mm 6-2-600
Outer diameter - inner diameter - length (mm) mm 6-2-600
Overflow valve
131424-4920
Overflow valve opening pressure
kPa
127
107
147
Overflow valve opening pressure
kgf/cm2
1.3
1.1
1.5
Tester oil delivery pressure
kPa
157
157
157
Tester oil delivery pressure
kgf/cm2
1.6
1.6
1.6
Direction of rotation (viewed from drive side)
Right R
Right R
Injection timing adjustment
Direction of rotation (viewed from drive side)
Right R
Right R
Injection order
1-3-4-2
Pre-stroke
mm
3.2
3.15
3.25
Beginning of injection position
Drive side NO.1
Drive side NO.1
Difference between angles 1
Cal 1-3 deg. 90 89.5 90.5
Cal 1-3 deg. 90 89.5 90.5
Difference between angles 2
Cal 1-4 deg. 180 179.5 180.5
Cal 1-4 deg. 180 179.5 180.5
Difference between angles 3
Cyl.1-2 deg. 270 269.5 270.5
Cyl.1-2 deg. 270 269.5 270.5
Injection quantity adjustment
Adjusting point
A
Rack position
8.9
Pump speed
r/min
1150
1150
1150
Average injection quantity
mm3/st.
87
85.9
88.1
Max. variation between cylinders
%
0
-2
2
Basic
*
Fixing the lever
*
Injection quantity adjustment_02
Adjusting point
C
Rack position
6+-0.5
Pump speed
r/min
650
650
650
Average injection quantity
mm3/st.
11.5
10.1
12.9
Max. variation between cylinders
%
0
-14
14
Fixing the rack
*
Injection quantity adjustment_03
Adjusting point
D
Rack position
-
Pump speed
r/min
100
100
100
Average injection quantity
mm3/st.
125
120
130
Fixing the lever
*
Rack limit
*
Test data Ex:
Governor adjustment
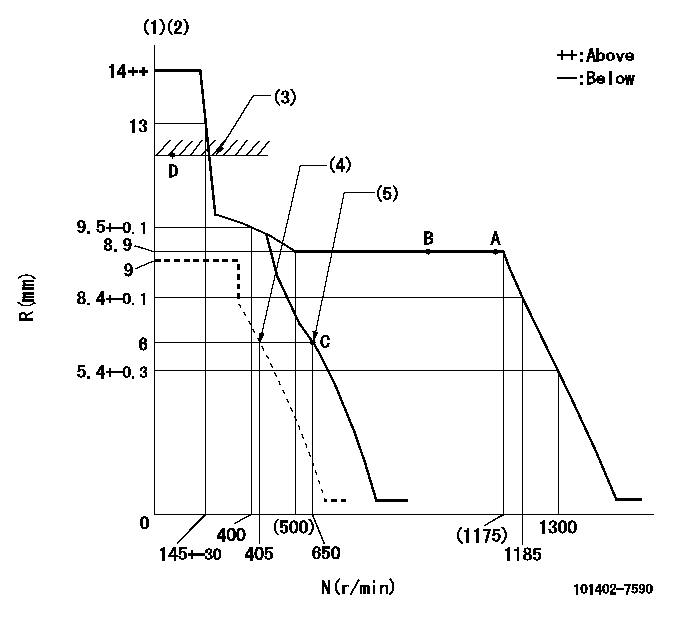
N:Pump speed
R:Rack position (mm)
(1)Target notch: K
(2)Tolerance for racks not indicated: +-0.05mm.
(3)RACK LIMIT
(4)Set idle sub-spring
(5)Main spring setting
----------
K=7
----------
----------
K=7
----------
Speed control lever angle
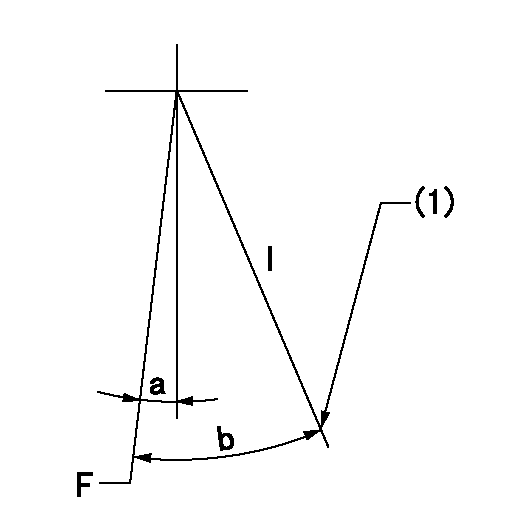
F:Full speed
I:Idle
(1)Stopper bolt setting
----------
----------
a=5deg+-5deg b=19deg+-5deg
----------
----------
a=5deg+-5deg b=19deg+-5deg
Stop lever angle

N:Pump normal
S:Stop the pump.
(1)Normal
----------
----------
a=4.5deg+-5deg b=53deg+-5deg
----------
----------
a=4.5deg+-5deg b=53deg+-5deg
Timing setting

(1)Pump vertical direction
(2)Position of gear mark 'CC' at No 1 cylinder's beginning of injection
(3)B.T.D.C.: aa
(4)-
----------
aa=12deg
----------
a=(100deg)
----------
aa=12deg
----------
a=(100deg)
Information:
TIMING PIN HOLE PLUG (Typical Example)
1. Plug.2. Rotate the crankshaft CLOCKWISE (as viewed from front of engine) until the timing pin drops into the timing slot in the fuel injection pump camshaft.3. Disconnect wire (2) from fuel shut off solenoid.
WIRE AND HOUSING
2. Wire. 3. Tachometer drive adapter housing.4. Remove the tachometer drive adapter housing (3).5. Use ratchet (4) and socket (5) to loosen automatic timing advance unit from fuel injection pump camshaft. Back off retaining bolt. The bolt will feel loose, then tighten up again when taper starts to separate from the camshaft.
REMOVING RETAINING BOLT
4. 8H8572 Ratchet. 5. 8S2357 Deep Well Socket.6. Remove the plug from timing hole (7) in the front cover and insert bolt (6). The cover retaining bolt from hole (8) may be used.
INSTALLING BOLT
6. 1D4539 Bolt [5/16 in. - 18 NC, 2.5 in. (63,5 mm) long]. 7. Timing hole. 8. Hole.7. Rotate crankshaft CLOCKWISE (as viewed from front of engine) until bolt (6) threads into the timing gear and is centered in timing hole (7). With timing pin in slot in fuel pump camshaft and the bolt (6) through the front cover and threaded into the timing gear, the fuel injection pump camshaft is timed to the engine.8. Remove the fuel injection pump housing retaining bolts (9).
RETAINING BOLTS
9. Retaining bolts.9. Remove the fuel injection pump housing and governor as a unit.
REMOVING HOUSINGInstall Fuel Injection Pump Housing and Governor
1. Install the fuel injection pump housing and governor as a unit. Install the fuel injection pump housing retaining bolts.2. Install the automatic timing advance unit retaining bolt and tighten retaining bolt to 35 2 lb. ft. (4.8 0.3 mkg).3. To check timing remove the timing pin and the bolt. Rotate the crankshaft two revolutions CLOCKWISE (as viewed from front of engine) and install the timing pin and bolt back in place. If the timing pin or bolt can not be installed, the fuel injection pump camshaft must be retimed.4. Remove the bolt (6) from the timing gear and install in hole (8). Install the plug into timing hole (7).5. Remove the timing pin from the timing slot in the fuel injection pump camshaft and install the plug in the timing hole.6. Install the tachometer drive adapter housing. Connect the wire to the fuel shut off solenoid.Disassemble Max-Min Governor
MAX-MIN GOVERNOR DISASSEMBLED
1. Seal. 2. Link. 3. Yoke. 4. Coned disc washer. 5. Washer.Assemble Max-Min Governor
MAX-MIN GOVERNOR
1. Seal. 2. Link. 3. Yoke. 4. Coned disc washer. 5. Washer.Install seal (1) with lip facing toward inside of governor housing.Link (2) must turn freely on yoke (3).Install coned disc washer (4) with concave side toward washer (5). The 1160 Engines, 5.0 in. (127.0 mm) stroke, do not have washer (4).
After disassembly and assembly, use the following initial settings to protect the engine from overspeed.
Disassemble Hydraulic Governor (9L9540 Governor)
HYDRAULIC GOVERNOR DISASSEMBLED
1. Seal. 2. Seal. 3. Weights.Assemble Hydraulic Governor (9L9540 Governor)
HYDRAULIC GOVERNOR
1. Seal. 2. Seal. 3. Weights.Lubricate seal (1) and all adjoining surfaces with clean engine oil (SAE 30).Install seal (2)
