Information injection-pump assembly
BOSCH
9 400 612 918
9400612918
ZEXEL
101402-2420
1014022420
HINO
220206320A
220206320a

Rating:
Service parts 101402-2420 INJECTION-PUMP ASSEMBLY:
1.
_
5.
AUTOM. ADVANCE MECHANIS
6.
COUPLING PLATE
8.
_
9.
_
11.
Nozzle and Holder
23600-3570A
12.
Open Pre:MPa(Kqf/cm2)
15.7{160}/21.6{220}
14.
NOZZLE
Cross reference number
BOSCH
9 400 612 918
9400612918
ZEXEL
101402-2420
1014022420
HINO
220206320A
220206320a
Zexel num
Bosch num
Firm num
Name
9 400 612 918
220206320A HINO
INJECTION-PUMP ASSEMBLY
W04D-T * K 14BD PE4AD PE
W04D-T * K 14BD PE4AD PE
Calibration Data:
Adjustment conditions
Test oil
1404 Test oil ISO4113 or {SAEJ967d}
1404 Test oil ISO4113 or {SAEJ967d}
Test oil temperature
degC
40
40
45
Nozzle and nozzle holder
105780-8140
Bosch type code
EF8511/9A
Nozzle
105780-0000
Bosch type code
DN12SD12T
Nozzle holder
105780-2080
Bosch type code
EF8511/9
Opening pressure
MPa
17.2
Opening pressure
kgf/cm2
175
Injection pipe
Outer diameter - inner diameter - length (mm) mm 6-2-600
Outer diameter - inner diameter - length (mm) mm 6-2-600
Overflow valve
131424-5720
Overflow valve opening pressure
kPa
255
255
255
Overflow valve opening pressure
kgf/cm2
2.6
2.6
2.6
Tester oil delivery pressure
kPa
255
255
255
Tester oil delivery pressure
kgf/cm2
2.6
2.6
2.6
Direction of rotation (viewed from drive side)
Right R
Right R
Injection timing adjustment
Direction of rotation (viewed from drive side)
Right R
Right R
Injection order
1-3-4-2
Pre-stroke
mm
4.8
4.75
4.85
Beginning of injection position
Drive side NO.1
Drive side NO.1
Difference between angles 1
Cal 1-3 deg. 90 89.5 90.5
Cal 1-3 deg. 90 89.5 90.5
Difference between angles 2
Cal 1-4 deg. 180 179.5 180.5
Cal 1-4 deg. 180 179.5 180.5
Difference between angles 3
Cyl.1-2 deg. 270 269.5 270.5
Cyl.1-2 deg. 270 269.5 270.5
Injection quantity adjustment
Adjusting point
A
Rack position
11.8
Pump speed
r/min
800
800
800
Average injection quantity
mm3/st.
86.5
84.5
88.5
Max. variation between cylinders
%
0
-3
3
Basic
*
Fixing the lever
*
Boost pressure
kPa
46.7
46.7
Boost pressure
mmHg
350
350
Injection quantity adjustment_02
Adjusting point
-
Rack position
7.9+-0.5
Pump speed
r/min
475
475
475
Average injection quantity
mm3/st.
11.5
10
13
Max. variation between cylinders
%
0
-15
15
Fixing the rack
*
Boost pressure
kPa
0
0
0
Boost pressure
mmHg
0
0
0
Remarks
Adjust only variation between cylinders; adjust governor according to governor specifications.
Adjust only variation between cylinders; adjust governor according to governor specifications.
Injection quantity adjustment_03
Adjusting point
E
Rack position
12.3++
Pump speed
r/min
100
100
100
Average injection quantity
mm3/st.
90
90
100
Fixing the lever
*
Boost pressure
kPa
0
0
0
Boost pressure
mmHg
0
0
0
Rack limit
*
Boost compensator adjustment
Pump speed
r/min
600
600
600
Rack position
R1-1
Boost pressure
kPa
12
9.3
14.7
Boost pressure
mmHg
90
70
110
Boost compensator adjustment_02
Pump speed
r/min
600
600
600
Rack position
R1(11.8)
Boost pressure
kPa
33.3
26.6
40
Boost pressure
mmHg
250
200
300
Test data Ex:
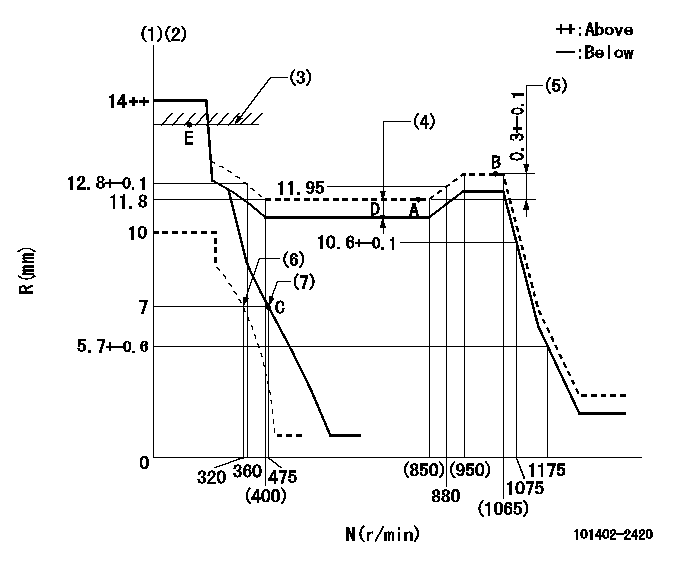
Governor adjustment

N:Pump speed
R:Rack position (mm)
(1)Target notch: K
(2)Tolerance for racks not indicated: +-0.05mm.
(3)RACK LIMIT
(4)Boost compensator stroke: BCL
(5)Rack difference between N = N1 and N = N2
(6)Set idle sub-spring
(7)Main spring setting
----------
K=13 BCL=1+-0.1mm N1=1050r/min N2=800r/min
----------
----------
K=13 BCL=1+-0.1mm N1=1050r/min N2=800r/min
----------
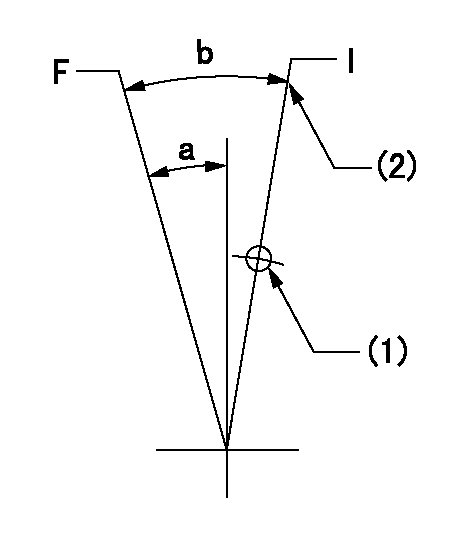
Speed control lever angle

F:Full speed
I:Idle
(1)Use the hole at R = aa
(2)Stopper bolt setting
----------
aa=100mm
----------
a=(15deg)+-5deg b=(27deg)+-5deg
----------
aa=100mm
----------
a=(15deg)+-5deg b=(27deg)+-5deg
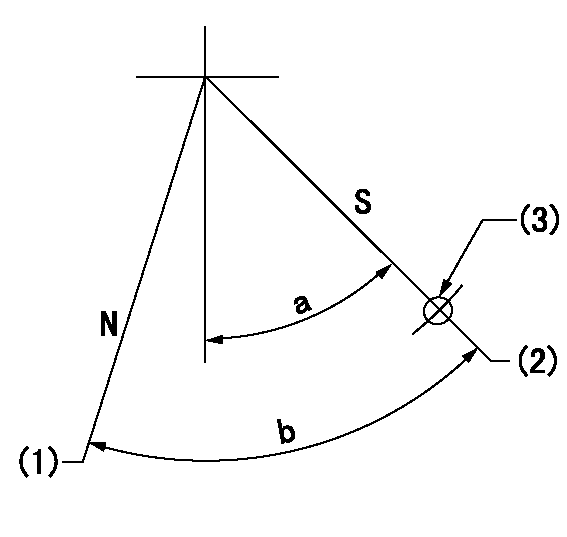
Stop lever angle

N:Pump normal
S:Stop the pump.
(1)Normal
(2)Pump speed aa and rack position bb (to be sealed at delivery)
(3)Use the hole above R = cc
----------
aa=0r/min bb=1-0.5mm cc=25mm
----------
a=21deg+-5deg b=(55deg)
----------
aa=0r/min bb=1-0.5mm cc=25mm
----------
a=21deg+-5deg b=(55deg)
Timing setting

(1)Pump vertical direction
(2)Position of gear's standard threaded hole at No 1 cylinder's beginning of injection
(3)-
(4)-
----------
----------
a=(70deg)
----------
----------
a=(70deg)
Information:
start by: a) remove pistons1. Check to be sure all coolant has been removed from the cylinder block.2. Put protection over the crankshaft bearing journals before removing cylinder liners.3. Put location marks on the cylinder liners with respect to their location in block. 4. Use tool setup (A) to remove the cylinder liners from block.5. Remove the seals from cylinder liners.6. Use a straight blade scraper to loosen the spacer plate (1) from cylinder block.
Use care when loosening the plate from cylinder block or damage to plate may result.
7. Remove the spacer plate (1).Install Cylinder Liners
1. Thoroughly clean both sides of spacer plate and top surface of block. Install spacer plate gasket and spacer plate on the cylinder block.
Make sure both sides of plate and top of block are clean and dry before installing gasket and plate. Do not put gasket adhesives or any other substance on these surfaces.
2. Put the cylinder liners in their respective positions in cylinder block. Install tool setup (B) and two cylinder head bolts and washers. Tighten the bolts to 70 5 lb.ft. (9.7 0.7 mkg).3. Check the cylinder liner projection using tool setup (C) as follows: a) Install the four spacers from tool group and four cylinder head bolts and washers. Tighten bolts to 70 5 lb.ft. (9.7 0.7 mkg).b) Use dial indicator, block, and gauge from the tool group to check liner projection at four locations around the liner.c) Cylinder liner projection must be .0030 to .0076 in. (0.076 to 0.193 mm). Projection between liners next to each other must not be different by more than .001 in. (0.025 mm). 4. Remove tool setup (B) and (C). Remove the liners from cylinder block.5. Install the O-ring seals on bottom of liners. Put liquid soap on the seals.
TYPICAL EXAMPLE6. Put oil on the filler band seal, and install the seal on top end of liner. Install the cylinder liners immediately into their respective locations in cylinder block using tool (A).
Do not let the filler band seal stay in oil except for a very short time because the oil will make the seal much bigger very fast. After putting oil on the filler band seal, install the liner immediately into block.
end by: a) install pistons.