Information injection-pump assembly
ZEXEL
101401-7750
1014017750
ISUZU
8972311810
8972311810
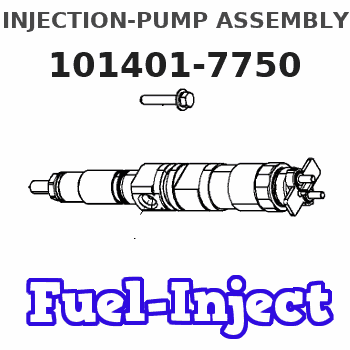
Rating:
Service parts 101401-7750 INJECTION-PUMP ASSEMBLY:
1.
_
6.
COUPLING PLATE
7.
COUPLING PLATE
8.
_
9.
_
11.
Nozzle and Holder
8-97200-570-2
12.
Open Pre:MPa(Kqf/cm2)
18.1{185}/21.1{215}
14.
NOZZLE
Cross reference number
ZEXEL
101401-7750
1014017750
ISUZU
8972311810
8972311810
Zexel num
Bosch num
Firm num
Name
Calibration Data:
Adjustment conditions
Test oil
1404 Test oil ISO4113 or {SAEJ967d}
1404 Test oil ISO4113 or {SAEJ967d}
Test oil temperature
degC
40
40
45
Nozzle and nozzle holder
105780-8310
Nozzle
105780-0120
Bosch type code
1 688 901 990
Nozzle holder
105780-2240
Opening pressure
MPa
18
Opening pressure
kgf/cm2
184
Injection pipe
Outer diameter - inner diameter - length (mm) mm 6-2-600
Outer diameter - inner diameter - length (mm) mm 6-2-600
Overflow valve
134424-3920
Overflow valve opening pressure
kPa
127
107
147
Overflow valve opening pressure
kgf/cm2
1.3
1.1
1.5
Tester oil delivery pressure
kPa
255
255
255
Tester oil delivery pressure
kgf/cm2
2.6
2.6
2.6
Direction of rotation (viewed from drive side)
Left L
Left L
Injection timing adjustment
Direction of rotation (viewed from drive side)
Left L
Left L
Injection order
1-3-4-2
Pre-stroke
mm
3.8
3.75
3.85
Rack position
Point A R=A
Point A R=A
Beginning of injection position
Governor side NO.1
Governor side NO.1
Difference between angles 1
Cal 1-3 deg. 90 89.5 90.5
Cal 1-3 deg. 90 89.5 90.5
Difference between angles 2
Cal 1-4 deg. 180 179.5 180.5
Cal 1-4 deg. 180 179.5 180.5
Difference between angles 3
Cyl.1-2 deg. 270 269.5 270.5
Cyl.1-2 deg. 270 269.5 270.5
Injection quantity adjustment
Adjusting point
-
Rack position
11.8
Pump speed
r/min
1000
1000
1000
Average injection quantity
mm3/st.
54
52.4
55.6
Max. variation between cylinders
%
0
-4
4
Basic
*
Fixing the rack
*
Standard for adjustment of the maximum variation between cylinders
*
Injection quantity adjustment_02
Adjusting point
H
Rack position
8.9+-0.5
Pump speed
r/min
315
315
315
Average injection quantity
mm3/st.
23
21.7
24.3
Max. variation between cylinders
%
0
-10
10
Fixing the rack
*
Standard for adjustment of the maximum variation between cylinders
*
Injection quantity adjustment_03
Adjusting point
A
Rack position
R1(11.8)
Pump speed
r/min
1000
1000
1000
Average injection quantity
mm3/st.
54
53
55
Basic
*
Fixing the lever
*
Boost pressure
kPa
61.3
61.3
Boost pressure
mmHg
460
460
Injection quantity adjustment_04
Adjusting point
B
Rack position
R1+1
Pump speed
r/min
1500
1500
1500
Average injection quantity
mm3/st.
57.5
53.5
61.5
Fixing the lever
*
Boost pressure
kPa
61.3
61.3
Boost pressure
mmHg
460
460
Injection quantity adjustment_05
Adjusting point
C
Rack position
R2-0.8
Pump speed
r/min
500
500
500
Average injection quantity
mm3/st.
49.8
45.8
53.8
Fixing the lever
*
Boost pressure
kPa
0
0
0
Boost pressure
mmHg
0
0
0
Boost compensator adjustment
Pump speed
r/min
500
500
500
Rack position
R2-0.8
Boost pressure
kPa
18
16.7
19.3
Boost pressure
mmHg
135
125
145
Boost compensator adjustment_02
Pump speed
r/min
500
500
500
Rack position
R2(R1-0.
25)
Boost pressure
kPa
48
48
48
Boost pressure
mmHg
360
360
360
Timer adjustment
Pump speed
r/min
1150--
Advance angle
deg.
0
0
0
Remarks
Start
Start
Timer adjustment_02
Pump speed
r/min
1100
Advance angle
deg.
0.5
Timer adjustment_03
Pump speed
r/min
1535
Advance angle
deg.
3
2.5
3.5
Remarks
Finish
Finish
Test data Ex:
Governor adjustment
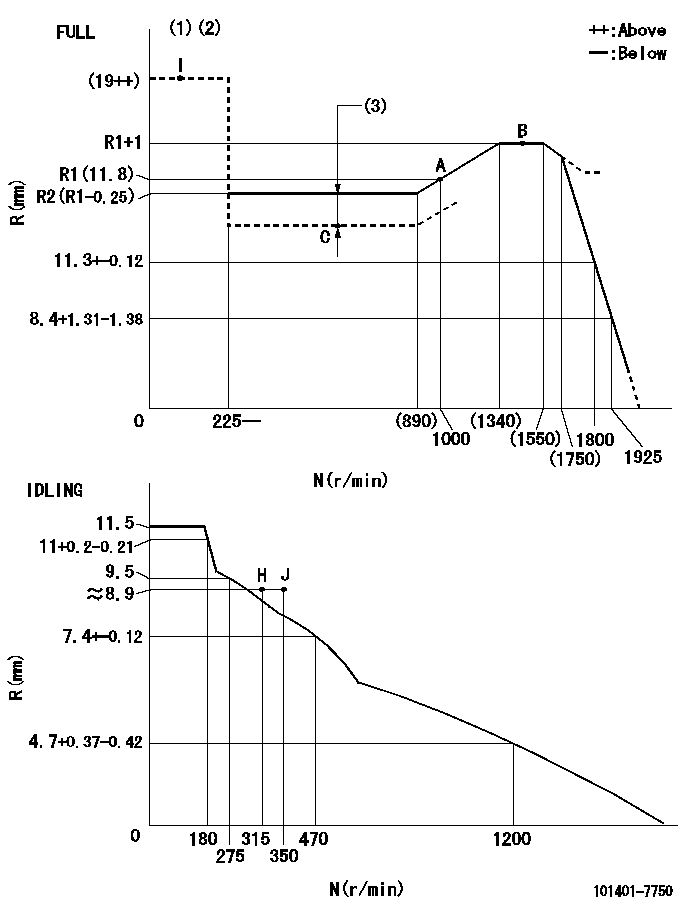
N:Pump speed
R:Rack position (mm)
(1)Torque cam stamping: T1
(2)Tolerance for racks not indicated: +-0.05mm.
(3)Boost compensator stroke: BCL
----------
T1=N40 BCL=0.8+-0.1mm
----------
----------
T1=N40 BCL=0.8+-0.1mm
----------
Speed control lever angle
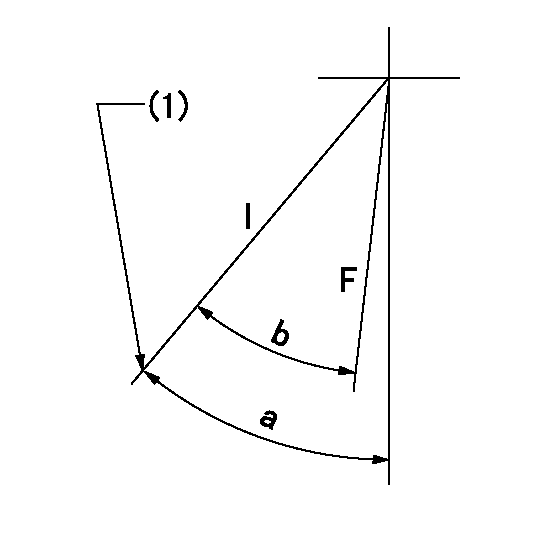
F:Full speed
I:Idle
(1)Stopper bolt set position 'H'
----------
----------
a=43deg+-5deg b=39.5deg+-3deg
----------
----------
a=43deg+-5deg b=39.5deg+-3deg
Stop lever angle
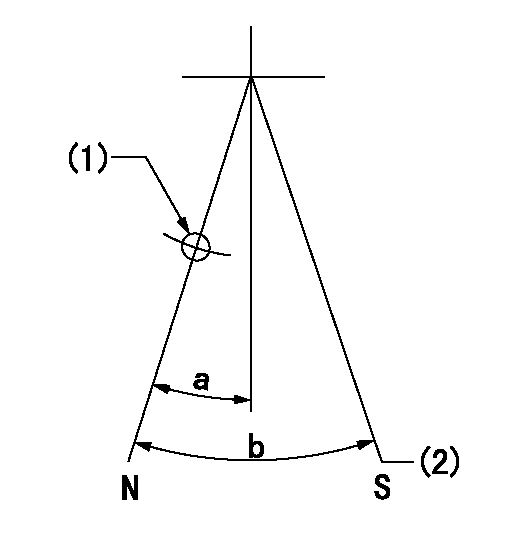
N:Pump normal
S:Stop the pump.
(1)Use the hole at R = aa
(2)At pump speed bb and rack position cc, set the stopper bolt.
----------
aa=58mm bb=1500r/min cc=3.5+-0.2mm
----------
a=23deg+-5deg b=(31deg)+-5deg
----------
aa=58mm bb=1500r/min cc=3.5+-0.2mm
----------
a=23deg+-5deg b=(31deg)+-5deg
0000001501 ACS
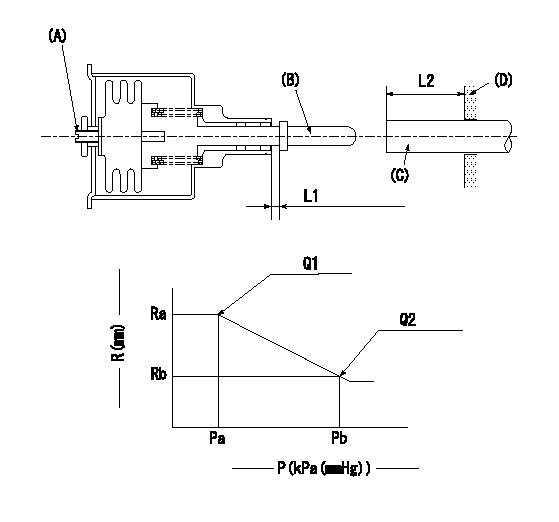
(A) Set screw
(B) Push rod 1
(C) Push rod 2
(D) Cover
1. Aneroid compensator unit adjustment
(1)Select the push rod 2 to obtain L2.
(2)Screw in (A) to obtain L1.
2. Adjustment when mounting the governor.
(1)Set the speed of the pump to N1 r/min and fix the control lever at the full set position.
(2)Screw in the aneroid compensator to obtain the performance shown in the graph above.
(3)As there is hysterisis, measure when the absolute pressure drops.
(4)Hysterisis must not exceed rack position = h1.
----------
N1=1000r/min L1=(1.5)mm L2=24+-0.5mm h1=0.15mm
----------
Ra=R1(11.8)mm Rb=(R1-0.2)mm Pa=(79.4)+-2.7kPa((596)+-20mmHg) Pb=70.1+-0.7kPa(526+-5mmHg) Q1=54+-1cm3/1000st Q2=53+-2cm3/1000st
----------
N1=1000r/min L1=(1.5)mm L2=24+-0.5mm h1=0.15mm
----------
Ra=R1(11.8)mm Rb=(R1-0.2)mm Pa=(79.4)+-2.7kPa((596)+-20mmHg) Pb=70.1+-0.7kPa(526+-5mmHg) Q1=54+-1cm3/1000st Q2=53+-2cm3/1000st
0000001601 ACS
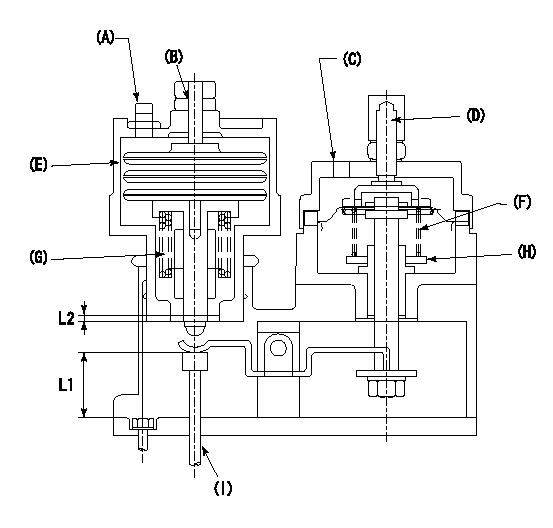
(A) Aneroid compensator
(B) Set screw
(C) Boost pressure inlet
(D) Rack positioning screw
(E): Aneroid compensator main body
(F) Boost compensator spring
(G): Aneroid compensator spring
(H): Adjusting notch
(I) Push rod
1. Instructions for adjusting the boost compensator with the aneroid compensator
(1)Select a pushrod to obtain L1 at full boost.
(2)Remove the aneroid compensator main body.
(3)Adjust the booster compensator stroke by turning the screw at (D.
(4)Adjust the beginning of boost compensator operation by turning the notch at (H).
(5)Install the aneroid compensator at full boost state.
(6)Turn (B)'s set screw so that the distance between the snapring and the body is L2.
(7)Screw in the aneroid compensator main body and adjust the point where it comes into play.
----------
L1=24+-0.5mm L2=1.5+-0.5mm
----------
----------
L1=24+-0.5mm L2=1.5+-0.5mm
----------
0000001701 RACK SENSOR
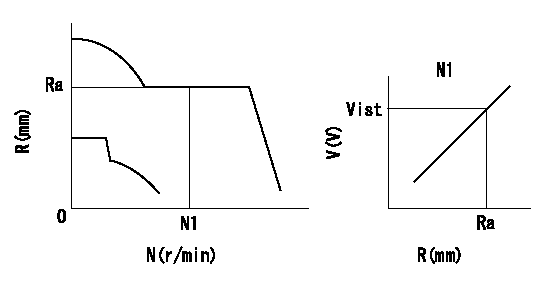
Rack sensor adjustment
1. Flange type rack sensor (rack sensor adjustment -5*20)
(1)These types of rack sensors do not need adjustment. Confirm the performance with the following procedures.
(2)Mount the rack sensor main body to the pump main body.
(3)Fix the pump lever at full.
(4)At supply voltage V1, pump speed N1 and rack position Ra, confirm that the amp's output voltage is Vist.
(5)Move the pump lever two or three times.
(6)Set again to full.
(7)Confirm that the amplifier output voltage is Vist.
(8)Fix the caution plate to the upper part of the rack sensor.
(For those without the caution plate instructions, make sure the nameplate of the rack sensor carries the "Don't hold here" caution.)
(9)Apply red paint to the rack sensor mounting bolts (2 places).
----------
V1=5+-0.01V N1=1500r/min Ra=R1(11.8)+1mm Vist=2.99+-0.28V
----------
----------
V1=5+-0.01V N1=1500r/min Ra=R1(11.8)+1mm Vist=2.99+-0.28V
----------
Timing setting
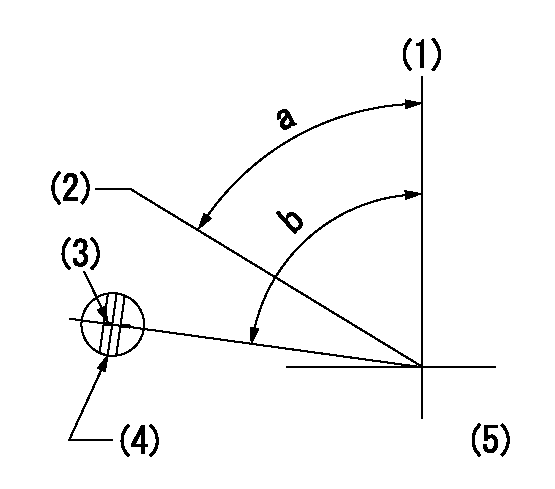
(1)Pump vertical direction
(2)Position of gear's standard threaded hole at No 1 cylinder's beginning of injection
(3)Stamping position on the A/T outer rim
(4)At the No 1 cylinder's beginning of injection, align with the aligning mark seen through the bracket's check hole and mark the A/T's bevel C1.
(5)B.T.D.C.: aa
----------
aa=9deg
----------
a=(60deg) b=(85deg)
----------
aa=9deg
----------
a=(60deg) b=(85deg)
Information:
3. Remove elbow (1) and fan drive lubricant tube (2).4. Loosen the clamps on hose (7), and move the hose down from cover (5).5. Disconnect cab heater return hose (6) at the valve.6. Mark the location of coolant conditioner hoses (3) and (4), and disconnect them at the fittings. 7. Remove O-ring seal (13) from elbow (11).8. Remove elbow (11) and tube (9).9. Disconnect cab heater supply valve (10) at the fitting.10. Remove four bolts (12) that hold the water pump to the bonnet. Remove O-ring seal (8) from the water pump. 11. Remove four nuts (15) and one bolt that hold water pump (14) to the timing gear housing.12. Remove the water pump and O-ring seal. The following steps are for installation of the water pump.13. Be sure the mating surface of the water pump and timing gear housing is clean.14. Be sure the mating surface of the water pump and bonnet is clean.15. Install a new O-ring seal on water pump (14).16. Install a new gasket between the water pump and the bonnet while installing the water pump on the timing gear housing.17. Install the four nuts and one bolt that hold water pump (14) to the timing gear housing.18. Install four bolts (12) that hold the water pump to the bonnet.19. Connect cab heater supply valve (10) to the fitting.20. Put clean glycerin on the O-ring seals, and install elbow (11) and tube (9). Install a new O-ring seal (13) in the elbow.21. Connect the coolant condition hoses (3) and (4) to the fittings. Connect the hoses in their original location.22. Connect cab heater return hose (6) to the valve.23. Move hose (7) into position on cover (5), and tighten the hose clamps.24. Install elbow (1) with new gaskets, and install fan drive lubricant tube (2).25. Fill the cooling system with coolant to the correct level. See the Maintenance Guide.Disassemble Water Pump
Start By:a. remove water pump 1. Remove O-ring seal (1) from adapter (2).2. Remove adapter (2) with a screwdriver. Remove the seal from the edge of adapter (2).3. Remove bolt (3) and the washer. 4. Remove impeller (4) from the water pump housing with Tooling (A). 5. Remove seal assembly (5). Remove ring and seal (6). 6. Remove the bolt and washer that hold gear (7) on the water pump shaft.7. Remove gear (7) with Tooling (B).8. Remove bolts and retainer (9).9. Remove O-ring seal (8). 10. Remove shaft (10) and the bearings as a unit.11. Remove bearing (11), spacer (12) and bearing (13) from shaft (10).12. Remove the lip-type seal from the gear side of the water pump. Remove the ring and seal from the impeller side of the water pump.13. Use 6V-1541 Quick Cure Primer to clean shaft (10) and the seal counterbore
Start By:a. remove water pump 1. Remove O-ring seal (1) from adapter (2).2. Remove adapter (2) with a screwdriver. Remove the seal from the edge of adapter (2).3. Remove bolt (3) and the washer. 4. Remove impeller (4) from the water pump housing with Tooling (A). 5. Remove seal assembly (5). Remove ring and seal (6). 6. Remove the bolt and washer that hold gear (7) on the water pump shaft.7. Remove gear (7) with Tooling (B).8. Remove bolts and retainer (9).9. Remove O-ring seal (8). 10. Remove shaft (10) and the bearings as a unit.11. Remove bearing (11), spacer (12) and bearing (13) from shaft (10).12. Remove the lip-type seal from the gear side of the water pump. Remove the ring and seal from the impeller side of the water pump.13. Use 6V-1541 Quick Cure Primer to clean shaft (10) and the seal counterbore
