Information injection-pump assembly
ZEXEL
101401-4403
1014014403
ISUZU
8971140020
8971140020
Rating:
Service parts 101401-4403 INJECTION-PUMP ASSEMBLY:
1.
_
6.
COUPLING PLATE
7.
COUPLING PLATE
8.
_
9.
_
11.
Nozzle and Holder
8-97114-315-2
12.
Open Pre:MPa(Kqf/cm2)
17.7{180}/21.6{220}
14.
NOZZLE
Cross reference number
ZEXEL
101401-4403
1014014403
ISUZU
8971140020
8971140020
Zexel num
Bosch num
Firm num
Name
Calibration Data:
Adjustment conditions
Test oil
1404 Test oil ISO4113 or {SAEJ967d}
1404 Test oil ISO4113 or {SAEJ967d}
Test oil temperature
degC
40
40
45
Nozzle and nozzle holder
105780-8140
Bosch type code
EF8511/9A
Nozzle
105780-0000
Bosch type code
DN12SD12T
Nozzle holder
105780-2080
Bosch type code
EF8511/9
Opening pressure
MPa
17.2
Opening pressure
kgf/cm2
175
Injection pipe
Outer diameter - inner diameter - length (mm) mm 6-2-600
Outer diameter - inner diameter - length (mm) mm 6-2-600
Overflow valve
134424-3920
Overflow valve opening pressure
kPa
127
107
147
Overflow valve opening pressure
kgf/cm2
1.3
1.1
1.5
Tester oil delivery pressure
kPa
157
157
157
Tester oil delivery pressure
kgf/cm2
1.6
1.6
1.6
Direction of rotation (viewed from drive side)
Left L
Left L
Injection timing adjustment
Direction of rotation (viewed from drive side)
Left L
Left L
Injection order
1-3-4-2
Pre-stroke
mm
3.8
3.75
3.85
Rack position
Point A R=A
Point A R=A
Beginning of injection position
Governor side NO.1
Governor side NO.1
Difference between angles 1
Cal 1-3 deg. 90 89.5 90.5
Cal 1-3 deg. 90 89.5 90.5
Difference between angles 2
Cal 1-4 deg. 180 179.5 180.5
Cal 1-4 deg. 180 179.5 180.5
Difference between angles 3
Cyl.1-2 deg. 270 269.5 270.5
Cyl.1-2 deg. 270 269.5 270.5
Injection quantity adjustment
Adjusting point
-
Rack position
13.2
Pump speed
r/min
1200
1200
1200
Average injection quantity
mm3/st.
93
91.4
94.6
Max. variation between cylinders
%
0
-4
4
Basic
*
Fixing the rack
*
Standard for adjustment of the maximum variation between cylinders
*
Injection quantity adjustment_02
Adjusting point
Z
Rack position
9.7+-0.5
Pump speed
r/min
400
400
400
Average injection quantity
mm3/st.
14.5
13.2
15.8
Max. variation between cylinders
%
0
-14
14
Fixing the rack
*
Standard for adjustment of the maximum variation between cylinders
*
Injection quantity adjustment_03
Adjusting point
A
Rack position
R1(13.2)
Pump speed
r/min
1200
1200
1200
Average injection quantity
mm3/st.
93
92
94
Basic
*
Fixing the lever
*
Boost pressure
kPa
62
62
Boost pressure
mmHg
465
465
Injection quantity adjustment_04
Adjusting point
B
Rack position
R1+0.25
Pump speed
r/min
1450
1450
1450
Average injection quantity
mm3/st.
95.5
91.5
99.5
Fixing the lever
*
Boost pressure
kPa
62
62
Boost pressure
mmHg
465
465
Injection quantity adjustment_05
Adjusting point
C
Rack position
R2-0.6
Pump speed
r/min
700
700
700
Average injection quantity
mm3/st.
75
71
79
Fixing the lever
*
Boost pressure
kPa
0
0
0
Boost pressure
mmHg
0
0
0
Injection quantity adjustment_06
Adjusting point
I
Rack position
-
Pump speed
r/min
150
150
150
Average injection quantity
mm3/st.
55
55
87
Fixing the lever
*
Boost pressure
kPa
0
0
0
Boost pressure
mmHg
0
0
0
Boost compensator adjustment
Pump speed
r/min
700
700
700
Rack position
R2-0.6
Boost pressure
kPa
26.7
25.4
28
Boost pressure
mmHg
200
190
210
Boost compensator adjustment_02
Pump speed
r/min
700
700
700
Rack position
R2(R1-0.
55)
Boost pressure
kPa
48.7
48.7
48.7
Boost pressure
mmHg
365
365
365
Timer adjustment
Pump speed
r/min
1250--
Advance angle
deg.
0
0
0
Remarks
Start
Start
Timer adjustment_02
Pump speed
r/min
1200
Advance angle
deg.
0.5
Timer adjustment_03
Pump speed
r/min
1450
Advance angle
deg.
3.8
3.3
4.3
Timer adjustment_04
Pump speed
r/min
-
Advance angle
deg.
4
3.5
4.5
Remarks
Measure the actual speed, stop
Measure the actual speed, stop
Test data Ex:
Governor adjustment
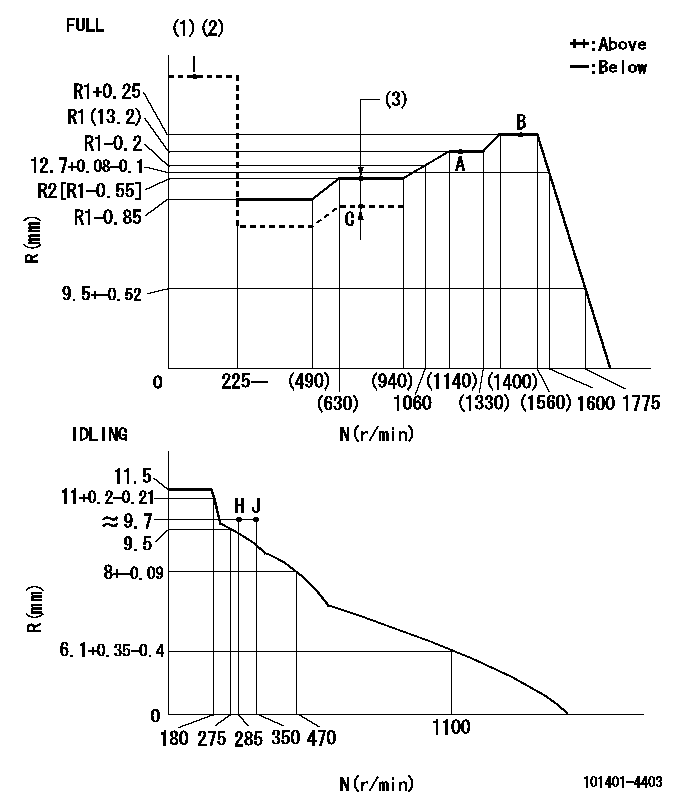
N:Pump speed
R:Rack position (mm)
(1)Torque cam stamping: T1
(2)Tolerances for racks not indicated: +-0.05mm.
(3)Boost compensator stroke: BCL
----------
T1=J03 BCL=0.6+-0.1mm
----------
----------
T1=J03 BCL=0.6+-0.1mm
----------
Speed control lever angle
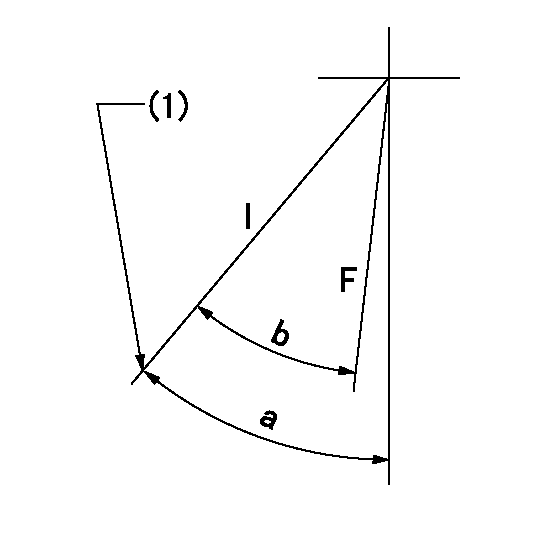
F:Full speed
I:Idle
(1)Stopper bolt set position 'H'
----------
----------
a=42deg+-5deg b=32deg+-3deg
----------
----------
a=42deg+-5deg b=32deg+-3deg
Stop lever angle
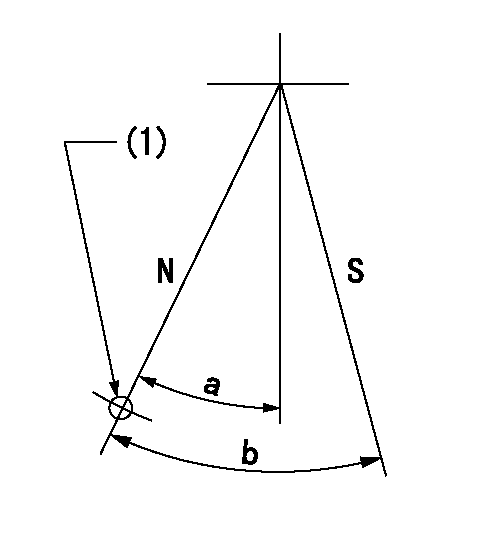
N:Pump normal
S:Stop the pump.
(1)Use the hole at R = aa
----------
aa=64mm
----------
a=20deg+-5deg b=29deg+-5deg
----------
aa=64mm
----------
a=20deg+-5deg b=29deg+-5deg
0000001501 MICRO SWITCH
Adjustment of the micro-switch
Adjust the bolt to obtain the following lever position when the micro-switch is ON.
(1)Speed N1
(2)Rack position Ra
----------
N1=1100r/min Ra=9.4+-0.1mm
----------
----------
N1=1100r/min Ra=9.4+-0.1mm
----------
0000001601 FICD
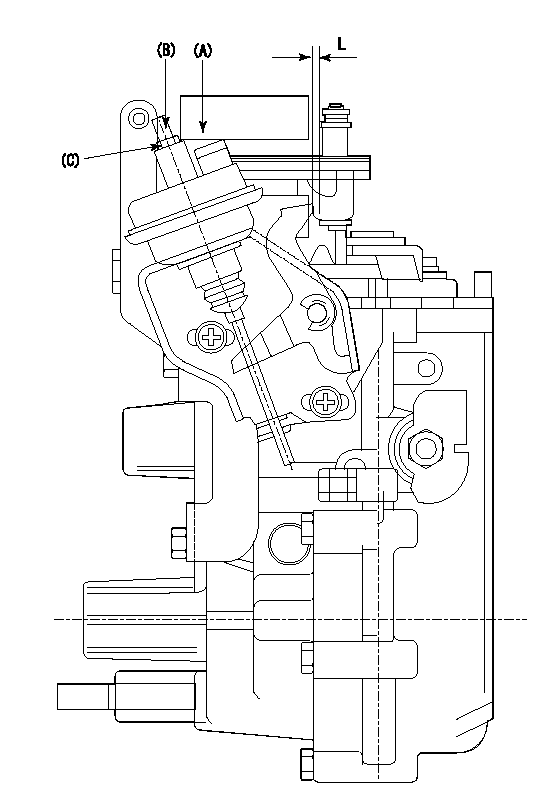
(A) applied negative pressure
(B) Screw
(c) Nut
1. Set the actuator as described below.
(1)Confirm that there is clearance between the actuator lever and the speed lever.
(2)Loosen the nut (C).
(3)Push in the screw (B).
(4)Apply P1 from the actuator (A) part.
(5)Pull out the screw (B) slowly.
(6)Tighten and fix the nut (C) when pump speed is Na and the rack position is Ra.
(7)Torque the nut (C) to T1.
(8)Apply P2 several times.
(9)Confirm that the actuator functions normally.
(10)Confirm that there is a clearance between the actuator lever and the speed lever at that time.
----------
P1=53.3kPa(400mmHg) P2=53.3kPa(400mmHg) Na=475r/min Ra=9.75+-0.1mm T1=1.2~1.6N-m(0.12~0.16kgf-m)
----------
L=(2)mm
----------
P1=53.3kPa(400mmHg) P2=53.3kPa(400mmHg) Na=475r/min Ra=9.75+-0.1mm T1=1.2~1.6N-m(0.12~0.16kgf-m)
----------
L=(2)mm
Timing setting
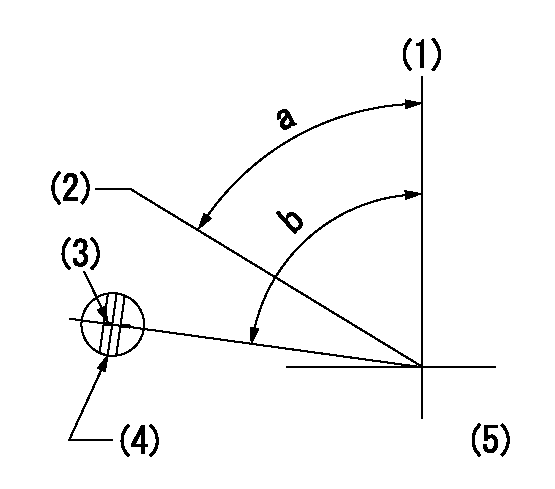
(1)Pump vertical direction
(2)Position of gear's standard threaded hole at No 1 cylinder's beginning of injection
(3)Stamping position on the A/T outer rim
(4)At the No 1 cylinder's beginning of injection, align with the aligning mark seen through the bracket's check hole and mark the A/T's bevel C1.
(5)B.T.D.C.: aa
----------
aa=9deg
----------
a=(60deg) b=(85deg)
----------
aa=9deg
----------
a=(60deg) b=(85deg)
Information:
Starting From External Electrical Source
Always wear protective glasses when working with batteries.Do not allow the free end of booster cables to make contact with each other or touch the engine. This will help prevent sparks near the batteries.Batteries give off flammable fumes that can explode.Do not smoke when observing the battery electrolyte levels.Electrolyte is an acid and can cause personal injury if it contacts skin or eyes.
Be sure the main power switch is in the OFF position before attaching the booster cables to the engine being started. When using booster cables, be sure to connect in parallel: POSITIVE (+) to POSITIVE (+) and NEGATIVE (-) to NEGATIVE (-).Use only equal voltage for boost starting. The use of a welder or higher voltage will damage the electrical system.
Engines without engine-to-frame ground straps can be damaged by electrical discharge.To prevent electrical discharge damage, check to make sure there is an engine-to-frame ground strap. For engines which have the alternator connected to an engine component, the ground strap must connect that component to the frame.Some engines have starter-to-frame ground straps. But, many of these starters are not electrically grounded to the engine. They have electrical insulation systems. For this reason, the starter-to-frame ground strap may not be an acceptable ground.Connect one end of cable to the POSITIVE (+) (ungrounded) terminal of the battery on the engine being started. Connect the other end to the POSITIVE (+) terminal of the power source.Connect one end of the second cable to the NEGATIVE (-) terminal of the power source. Connect the other end to the frame of the engine to be started.Turn the start switch on and start the engine.Disconnect the cable from the frame first. Disconnect the other end from the NEGATIVE (-) terminal of the power source. Disconnect the cable from the POSITIVE (+) terminal of the battery. Disconnect the other end from the POSITIVE (+) terminal of the power source.