Information injection-pump assembly
ZEXEL
101401-0741
1014010741
ISUZU
8944556961
8944556961

Rating:
Cross reference number
ZEXEL
101401-0741
1014010741
ISUZU
8944556961
8944556961
Zexel num
Bosch num
Firm num
Name
Calibration Data:
Adjustment conditions
Test oil
1404 Test oil ISO4113 or {SAEJ967d}
1404 Test oil ISO4113 or {SAEJ967d}
Test oil temperature
degC
40
40
45
Nozzle and nozzle holder
105780-8140
Bosch type code
EF8511/9A
Nozzle
105780-0000
Bosch type code
DN12SD12T
Nozzle holder
105780-2080
Bosch type code
EF8511/9
Opening pressure
MPa
17.2
Opening pressure
kgf/cm2
175
Injection pipe
Outer diameter - inner diameter - length (mm) mm 6-2-600
Outer diameter - inner diameter - length (mm) mm 6-2-600
Overflow valve
131424-4920
Overflow valve opening pressure
kPa
127
107
147
Overflow valve opening pressure
kgf/cm2
1.3
1.1
1.5
Tester oil delivery pressure
kPa
157
157
157
Tester oil delivery pressure
kgf/cm2
1.6
1.6
1.6
Direction of rotation (viewed from drive side)
Right R
Right R
Injection timing adjustment
Direction of rotation (viewed from drive side)
Right R
Right R
Injection order
1-3-4-2
Pre-stroke
mm
3.6
3.55
3.65
Rack position
After adjusting injection quantity. R=A
After adjusting injection quantity. R=A
Beginning of injection position
Drive side NO.1
Drive side NO.1
Difference between angles 1
Cal 1-3 deg. 90 89.5 90.5
Cal 1-3 deg. 90 89.5 90.5
Difference between angles 2
Cal 1-4 deg. 180 179.5 180.5
Cal 1-4 deg. 180 179.5 180.5
Difference between angles 3
Cyl.1-2 deg. 270 269.5 270.5
Cyl.1-2 deg. 270 269.5 270.5
Injection quantity adjustment
Adjusting point
-
Rack position
11.6
Pump speed
r/min
950
950
950
Average injection quantity
mm3/st.
65.5
63.9
67.1
Max. variation between cylinders
%
0
-4
4
Basic
*
Fixing the rack
*
Standard for adjustment of the maximum variation between cylinders
*
Injection quantity adjustment_02
Adjusting point
H
Rack position
9.5+-0.5
Pump speed
r/min
275
275
275
Average injection quantity
mm3/st.
9.4
8.1
10.7
Max. variation between cylinders
%
0
-14
14
Fixing the rack
*
Standard for adjustment of the maximum variation between cylinders
*
Injection quantity adjustment_03
Adjusting point
A
Rack position
R1(11.6)
Pump speed
r/min
950
950
950
Average injection quantity
mm3/st.
65.5
64.5
66.5
Basic
*
Fixing the lever
*
Injection quantity adjustment_04
Adjusting point
B
Rack position
R1(11.6)
Pump speed
r/min
1600
1600
1600
Average injection quantity
mm3/st.
73.7
70.5
76.9
Fixing the lever
*
Injection quantity adjustment_05
Adjusting point
C
Rack position
R1-0.2
Pump speed
r/min
650
650
650
Average injection quantity
mm3/st.
48.2
45
51.4
Fixing the lever
*
Injection quantity adjustment_06
Adjusting point
I
Rack position
-
Pump speed
r/min
150
150
150
Average injection quantity
mm3/st.
90
90
98
Fixing the lever
*
Rack limit
*
Timer adjustment
Pump speed
r/min
1100--
Advance angle
deg.
0
0
0
Remarks
Start
Start
Timer adjustment_02
Pump speed
r/min
1050
Advance angle
deg.
0.3
Timer adjustment_03
Pump speed
r/min
1600
Advance angle
deg.
5
4
5
Remarks
Finish
Finish
Test data Ex:
Governor adjustment

N:Pump speed
R:Rack position (mm)
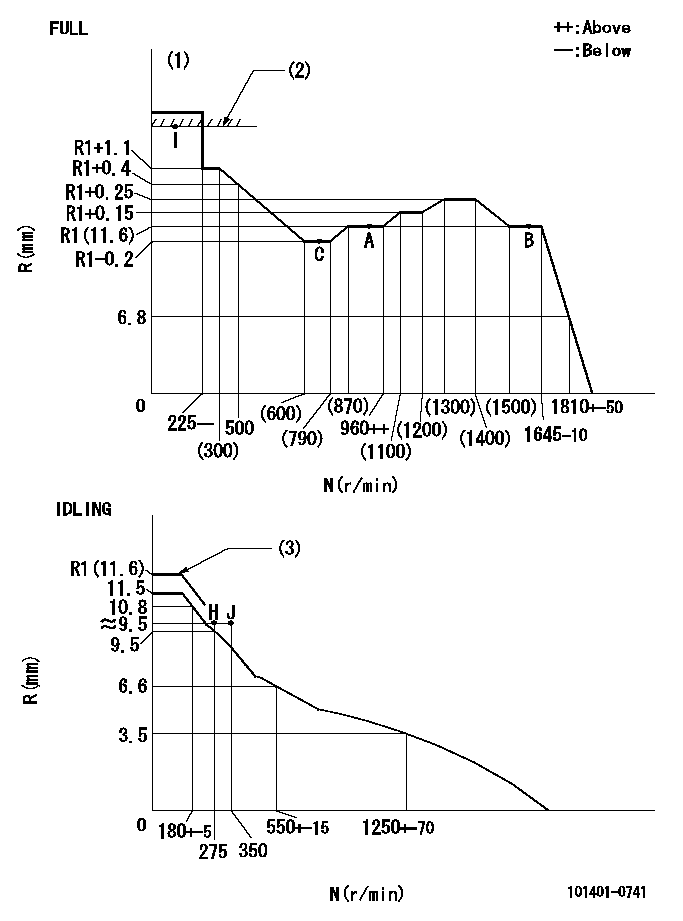
(1)Torque cam stamping: T1
(2)RACK LIMIT
(3)At delivery (at R = A, N = N1)
----------
T1=C38 N1=100r/min
----------
----------
T1=C38 N1=100r/min
----------
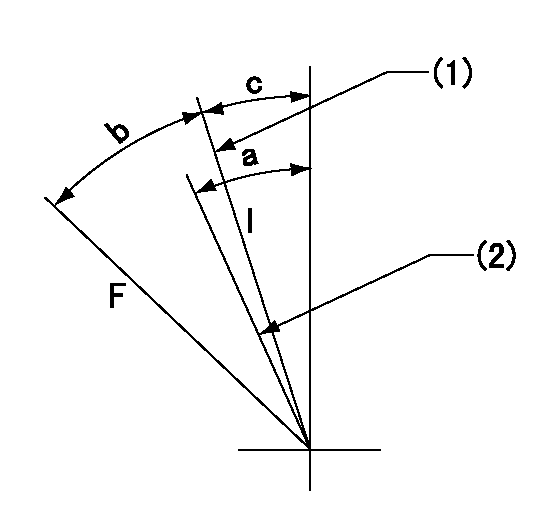
Speed control lever angle

F:Full speed
I:Idle
(1)Stopper bolt set position 'H'
(2)Set the idle side stopper bolt at rack position = aa (at delivery).
----------
aa=R1(11.6)mm
----------
a=2.5deg+-5deg b=43deg+-3deg c=2.5deg+-5deg
----------
aa=R1(11.6)mm
----------
a=2.5deg+-5deg b=43deg+-3deg c=2.5deg+-5deg
Stop lever angle

N:Pump normal
S:Stop the pump.
----------
----------
a=20deg+-5deg b=40deg+-5deg
----------
----------
a=20deg+-5deg b=40deg+-5deg
Timing setting

(1)Pump vertical direction
(2)Position of gear mark 'CC' at No 1 cylinder's beginning of injection
(3)B.T.D.C.: aa
(4)-
----------
aa=14deg
----------
a=(100deg)
----------
aa=14deg
----------
a=(100deg)
Information:
GENERAL
1. Schematic
Schematic2. Specifications INSPECTION
1. Oil pumpVisually check the pump for rough rotation or other defects. Replace the pump assembly if defective.
Checking oil pump2. Oil pressure switch (1) Test for continuity between the terminal and body with an ohmmeter as shown in the illustration. No continuity is the cause for replacing the switch.
Testing oil pressure switch (1)(2) Insert a small diameter bar into the oil hole in the switch and lightly push it in to test for no continuity as shown in the illustration. Any continuity is the cause for replacing the switch.(3) Apply a pressure air of 0.5 kgf/cm2 (7 psi) [49 kPa] to the switch through the oil hole to test for no continuity. Any continuity is the cause for replacing the switch. Also, check for air leaks. Any air leak is an indication of a ruptured diaphragm. In such a case, replace the switch.
Testing oil pressure switch (2)3. Pressure relief valve (1) Check the valve seat for contact. Check the spring for damage.(2) Measure the oil pressure at which the relief valve opens (the oil pressure with the engine running at the rated rpm). If the pressure is not correct, remove the cap nut and increase or decrease the amount of shims. The engine oil pressure tap is located on the right side of the engine.
Checking pressure relief valve