Information injection-pump assembly
BOSCH
F 019 Z10 921
f019z10921
ZEXEL
101302-9020
1013029020

Rating:
Include in #1:
106871-8940
as _
Cross reference number
BOSCH
F 019 Z10 921
f019z10921
ZEXEL
101302-9020
1013029020
Zexel num
Bosch num
Firm num
Name
101302-9020
F 019 Z10 921
DPICO
INJECTION-PUMP ASSEMBLY
3D100-AT Q
3D100-AT Q
Calibration Data:
Adjustment conditions
Test oil
1404 Test oil ISO4113 or {SAEJ967d}
1404 Test oil ISO4113 or {SAEJ967d}
Test oil temperature
degC
40
40
45
Nozzle and nozzle holder
105780-8140
Bosch type code
EF8511/9A
Nozzle
105780-0000
Bosch type code
DN12SD12T
Nozzle holder
105780-2080
Bosch type code
EF8511/9
Opening pressure
MPa
17.2
Opening pressure
kgf/cm2
175
Injection pipe
Outer diameter - inner diameter - length (mm) mm 6-2-600
Outer diameter - inner diameter - length (mm) mm 6-2-600
Overflow valve
134424-1420
Overflow valve opening pressure
kPa
162
147
177
Overflow valve opening pressure
kgf/cm2
1.65
1.5
1.8
Tester oil delivery pressure
kPa
157
157
157
Tester oil delivery pressure
kgf/cm2
1.6
1.6
1.6
Direction of rotation (viewed from drive side)
Right R
Right R
Injection timing adjustment
Direction of rotation (viewed from drive side)
Right R
Right R
Injection order
1-3-2
Pre-stroke
mm
3.3
3.25
3.35
Beginning of injection position
Governor side NO.1
Governor side NO.1
Difference between angles 1
Cal 1-3 deg. 120 119.5 120.5
Cal 1-3 deg. 120 119.5 120.5
Difference between angles 2
Cyl.1-2 deg. 240 239.5 240.5
Cyl.1-2 deg. 240 239.5 240.5
Injection quantity adjustment
Adjusting point
A
Rack position
9.5
Pump speed
r/min
1300
1300
1300
Average injection quantity
mm3/st.
46.2
45.2
47.2
Max. variation between cylinders
%
0
-2.5
2.5
Basic
*
Fixing the lever
*
Injection quantity adjustment_02
Adjusting point
-
Rack position
7.2+-0.5
Pump speed
r/min
475
475
475
Average injection quantity
mm3/st.
8
6.5
9.5
Max. variation between cylinders
%
0
-15
15
Fixing the rack
*
Remarks
Adjust only variation between cylinders; adjust governor according to governor specifications.
Adjust only variation between cylinders; adjust governor according to governor specifications.
Test data Ex:
Governor adjustment
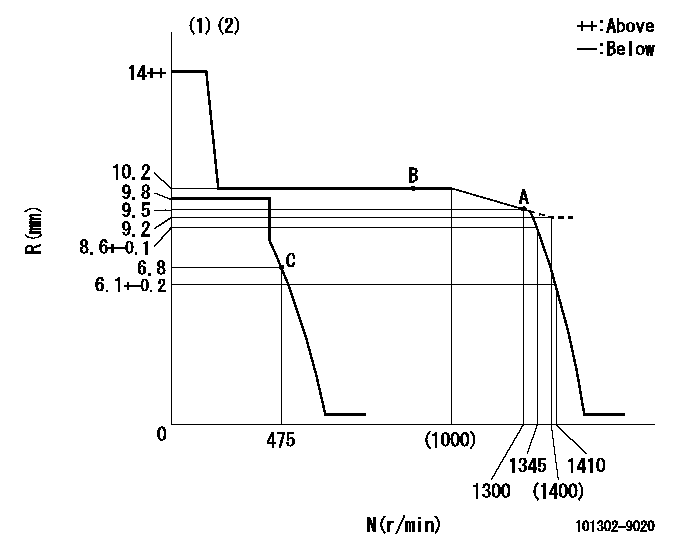
N:Pump speed
R:Rack position (mm)
(1)Target notch: K
(2)Tolerance for racks not indicated: +-0.05mm.
----------
K=10
----------
----------
K=10
----------
Speed control lever angle

F:Full speed
I:Idle
(1)Stopper bolt setting
----------
----------
a=(14deg)+-5deg b=(34deg)+-5deg
----------
----------
a=(14deg)+-5deg b=(34deg)+-5deg
Stop lever angle
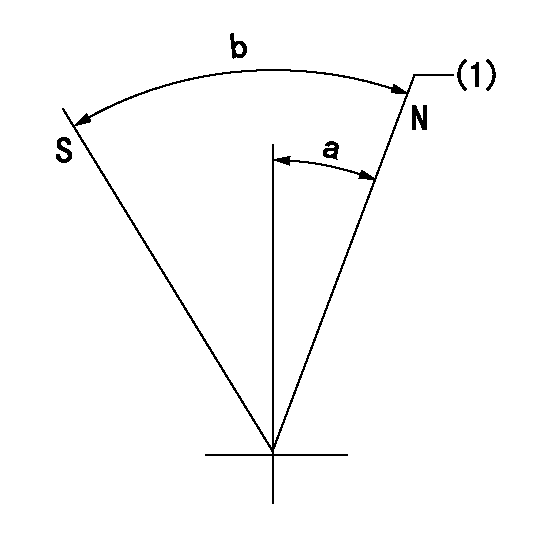
N:Pump normal
S:Stop the pump.
(1)Normal
----------
----------
a=15deg+-5deg b=53deg+-5deg
----------
----------
a=15deg+-5deg b=53deg+-5deg
Timing setting

(1)Pump vertical direction
(2)Position of gear mark 'B' at the No 3 cylinder's beginning of injection
(3)B.T.D.C.: aa
(4)-
----------
aa=17deg
----------
a=(100deg)
----------
aa=17deg
----------
a=(100deg)
Information:
Cat Data Logging and Alarm System (DLAS) 300
The Cat DPF system requires a Cat Data Logging and Alarm System (DLAS). The Cat DLAS measures and records exhaust temperature and backpressure. These parameters are essential in determining whether the application duty cycle is acceptable for the filter. There are also a series of alarms to help the user in case a problem occurs.Establishing an Ethernet Connection
Connect a laptop or other computer to the DLAS300 using an ethernet cable. The ethernet cable is also referred to as a LAN or network cable.
Verify that the green link light on the ethernet connector is on.
Wait for Windows to configure the network.
Start Internet Explorer, Firefox, Chrome or another web browser on the laptop.
Enter dlas300 or 169.254.1.1 into the address bar of the web browser. The web page should begin to display within a few seconds.
If the page cannot be found, or if a different web page is displayed, refer to network troubleshooting.To communicate with the DLAS300, the ethernet adapter on the laptop must be configured with an IP address on the 169.254.0.0/16 network. If the laptop is configured to use DHCP but cannot find a DHCP server, Windows will use Automatic Private IP Addressing (APIPA) to choose an IP address on the 169.254.0.0/16 network.An alternate solution is to configure the Internet Protocol (TCP/IP) Properties with a static IP address. To configure a static IP address, follow the steps below:
Open "Network Connections" from the control panel and change the settings of the ethernet connection. Ethernet connection is often called Local Area Connection.
From the "Properties" dialog box, select "Internet Protocol" (TCP/IP) and click "Properties".
The 169.254.2.1 address is a suggestion.
Any IP address other than 169.254.1.1 or the DLAS300 address can be used.web Browser Proxy Settings
The web browser may be configured with proxy settings that prevent accessing the DLAS300. To disable the proxy settings for Internet Explorer or other browsers, follow the steps below:
Open the "Internet Options" dialog box.
Open the dialog box from either the tools menu of Internet Explorer or from the control panel.
Select the "Connections" tab and click the "LAN settings" button.
On the "Local Area Network (LAN) Settings" dialog box, de-select everything.Downloading Data
The logged data can be copied to a USB flash drive or downloaded through the web interface. The resulting data file is in comma-separated value (CSV) format for easy import into Microsoft Excel or other data analysis software. The first two lines of the file contain the engine name, engine serial number, catalyst serial number, and initial performance test results.To copy the logged data to a USB flash drive, perform the following steps:
Insert the USB flash drive into the USB port on the front panel.
Press and release the front panel button.
Monitor the activity light on the USB flash drive. The transfer is complete when no activity is indicated for more than 5 seconds. If the USB flash drive does not have an activity light, wait at least 5 minutes to ensure that all data has been copied.
Remove the USB flash driveCopying may take
Have questions with 101302-9020?
Group cross 101302-9020 ZEXEL
Dpico
101302-9020
F 019 Z10 921
INJECTION-PUMP ASSEMBLY
3D100-AT
3D100-AT