Information
ZEXEL
106662-2040
1066622040
MITSUBISHI-HEAV
0429050191
0429050191

Rating:
Service parts 106662-2040 INJECTION-PUMP ASSEMBLY:
1.
_
2.
FUEL INJECTION PUMP
5.
AUTOM. ADVANCE MECHANIS
6.
COUPLING PLATE
7.
COUPLING PLATE
8.
_
9.
_
10.
NOZZLE AND HOLDER ASSY
11.
Nozzle and Holder
12.
Open Pre:MPa(Kqf/cm2)
13.
NOZZLE-HOLDER
14.
NOZZLE
15.
NOZZLE SET
Include in #1:
106662-2040
as INJECTION-PUMP ASSEMBLY
Cross reference number
ZEXEL
106662-2040
1066622040
MITSUBISHI-HEAV
0429050191
0429050191
Zexel num
Bosch num
Firm num
Name
Calibration Data:
Adjustment conditions
Test oil
1404 Test oil ISO4113 or {SAEJ967d}
1404 Test oil ISO4113 or {SAEJ967d}
Test oil temperature
degC
40
40
45
Nozzle
105780-0020
Bosch type code
DN4SD24T
Nozzle holder
105031-2010
Bosch type code
KB56SD273
Opening pressure
MPa
11.8
Opening pressure
kgf/cm2
120
Injection pipe
Outer diameter - inner diameter - length (mm) mm 6-2-600
Outer diameter - inner diameter - length (mm) mm 6-2-600
Overflow valve
132424-0620
Overflow valve opening pressure
kPa
157
123
191
Overflow valve opening pressure
kgf/cm2
1.6
1.25
1.95
Tester oil delivery pressure
kPa
157
157
157
Tester oil delivery pressure
kgf/cm2
1.6
1.6
1.6
Direction of rotation (viewed from drive side)
Right R
Right R
Injection timing adjustment
Direction of rotation (viewed from drive side)
Right R
Right R
Injection order
1-5-3-6-
2-4
Pre-stroke
mm
2.05
2
2.1
Beginning of injection position
Drive side NO.1
Drive side NO.1
Difference between angles 1
Cal 1-5 deg. 60 59.5 60.5
Cal 1-5 deg. 60 59.5 60.5
Difference between angles 2
Cal 1-3 deg. 120 119.5 120.5
Cal 1-3 deg. 120 119.5 120.5
Difference between angles 3
Cal 1-6 deg. 180 179.5 180.5
Cal 1-6 deg. 180 179.5 180.5
Difference between angles 4
Cyl.1-2 deg. 240 239.5 240.5
Cyl.1-2 deg. 240 239.5 240.5
Difference between angles 5
Cal 1-4 deg. 300 299.5 300.5
Cal 1-4 deg. 300 299.5 300.5
Injection quantity adjustment
Adjusting point
A
Rack position
18+-0.5
Pump speed
r/min
900
900
900
Average injection quantity
mm3/st.
280
272
288
Max. variation between cylinders
%
0
-3
3
Basic
*
Fixing the rack
*
Injection quantity adjustment_02
Adjusting point
B
Rack position
6.5+-0.5
Pump speed
r/min
250
250
250
Average injection quantity
mm3/st.
35
31.5
38.5
Max. variation between cylinders
%
0
-10
10
Fixing the rack
*
Test data Ex:
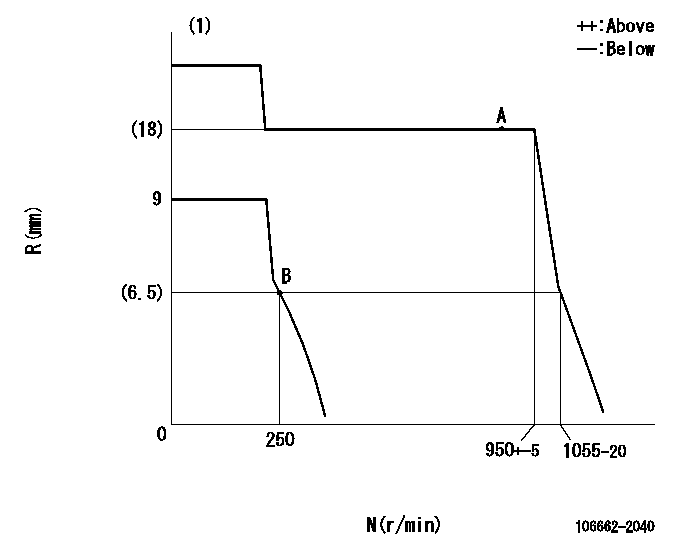
Governor adjustment

N:Pump speed
R:Rack position (mm)
(1)Target notch: K
----------
K=10
----------
----------
K=10
----------
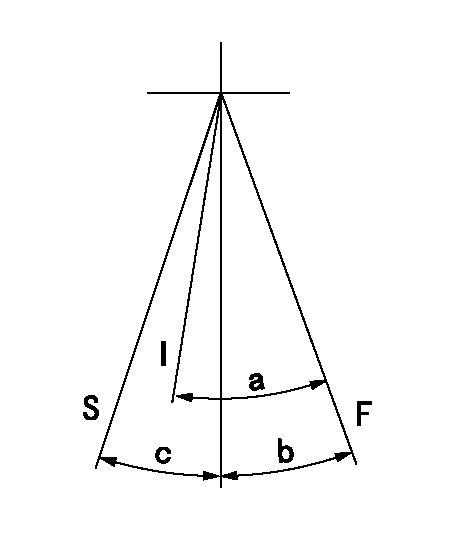
Speed control lever angle

F:Full speed
I:Idle
S:Stop
----------
----------
a=33deg+-5deg b=8deg+-5deg c=32deg+-3deg
----------
----------
a=33deg+-5deg b=8deg+-5deg c=32deg+-3deg
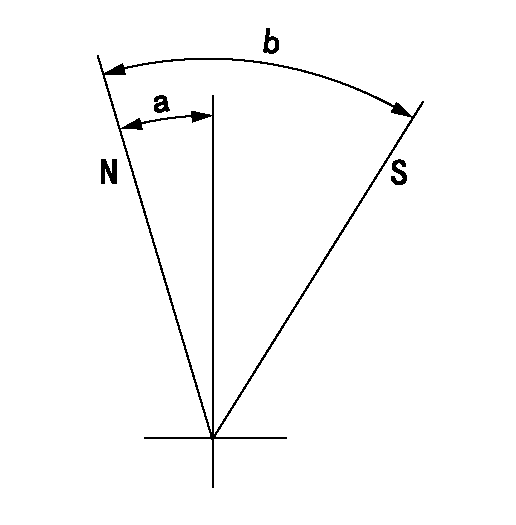
Stop lever angle

N:Pump normal
S:Stop the pump.
----------
----------
a=(11deg) b=(53deg)
----------
----------
a=(11deg) b=(53deg)
Information:
Parts Location
Illustration 2 g01880455
Exploded view
Illustration 3 g01880482
Diesel Particulate Filter Group (shown installed) (1) 5P-1076 Hard Washer (2) 8T-4121 Hard Washer (3) 8T-4139 Bolt (4) 8T-4195 Bolt (5) 141-1480 Clamp As (6) 233-8141 Diesel Particulate Filter Gp (7) 8T-4244 Nut (8) 235-3962 Support As (9) 235-3963 Clamp As Installation Procedure
You must thoroughly understand the guidelines in Special Instruction, REHS5606, "Installation and Operation of the Caterpillar Diesel Particulate Filter (DPF) and the Diagnostic Module for Non-Road Machine Applications (Non-California Applications)" before you attempt any part of the following installation procedure.The installation procedure that follows is specific for the listed machines.Diesel Particulate Filter Installation
Illustration 4 g01833715
Right Side View (14) Muffler (existing) (15) 208-5448 Support As (existing) (16) 208-5451 Support As (existing)
Remove the existing muffler (14). Refer to the appropriate Disassembly and Assembly manual for your machine. Refer to Illustration 4.
Remove the existing 208-5448 Support As (15) from the engine. Discard the existing support assembly. Refer to Illustration 4.Note: Do not remove the existing 208-5451 Support As (16). Refer to Illustration 4.
Illustration 5 g01880233
(2) 8T-4121 Hard Washers (4) 8T-4195 Bolts (8) 235-3962 Support As
Position 235-3962 Support As (8) in the former location for support assembly (15). Refer to Illustration 4.
Secure support assembly (8) by using two 8T-4195 Bolts (4) and two 8T-4121 Hard Washers (2). Refer to Illustration 5.
Illustration 6 g01879959
(1) 5P-1076 Hard Washers (3) 8T-4139 Bolts (7) 8T-4244 Nut (8) 235-3962 Support As (9) 235-3963 Clamp As (Lower half)
Remove the two bolts, two hard washers, two lock washers, and two nuts from 235-3963 Clamp As (9). Keep these parts together along with