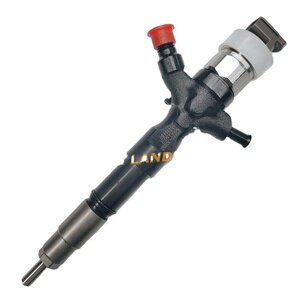
Information injector assy

Rating:
Compare Prices: .
As an associate, we earn commssions on qualifying purchases through the links below

Parts# 23670-30050 095000-5880 095000-5881 095000-5660 23670-39095 Fuel Injector Assy 1piece/Pack DRAGOON-BRO
DRAGOON-BRO PARTS# 23670-30050 095000-5880 095000-5881 095000-5660 23670-39095 || Check your parts number before purchasing or send VIN to us,we will check the right parts number for you. || High performance and superior quality. || If you have any questions,please be free to contact us. || DRAGOON-BRO
DRAGOON-BRO PARTS# 23670-30050 095000-5880 095000-5881 095000-5660 23670-39095 || Check your parts number before purchasing or send VIN to us,we will check the right parts number for you. || High performance and superior quality. || If you have any questions,please be free to contact us. || DRAGOON-BRO

1 PC/Set of Fuel Injector Assy 23670-30050 095000-5880 095000-5881 095000-5660 23670-39095 (MOLEI-AUTO)
MOLEI-AUTO Before purchasing, please check the part number on your original part and make sure it is the same part number as in the selling link. || Before purchasing, please check the part number on your original part and make sure it is the same part number as in the selling link. || ONE YEAR WARRANTY FOR ALL OF OUR PRODUCTS || Please double confirm the matching OE number of your corresponding model before purchasing. If you are not sure, Please send us your vehicle identification number right away to check about suitability info. || MOLEI-AUTO, PRESELECTED AUTO PARTS, STABLE PERFORMANCE ALL THE WAY.
MOLEI-AUTO Before purchasing, please check the part number on your original part and make sure it is the same part number as in the selling link. || Before purchasing, please check the part number on your original part and make sure it is the same part number as in the selling link. || ONE YEAR WARRANTY FOR ALL OF OUR PRODUCTS || Please double confirm the matching OE number of your corresponding model before purchasing. If you are not sure, Please send us your vehicle identification number right away to check about suitability info. || MOLEI-AUTO, PRESELECTED AUTO PARTS, STABLE PERFORMANCE ALL THE WAY.

You can express buy:

USD 169.9
05-10-2024
05-10-2024
USD 172.52
23-12-2022
23-12-2022
095000-5881 23670-30050 Diesel fuel injector 2367030050
USD 217.04
25-11-2022
25-11-2022
fuel Injector 23670-51060 095000-5881 095000-8740 095000-5881095000-8740 095000-5600 095000-5881 09500 95000-829000-8740
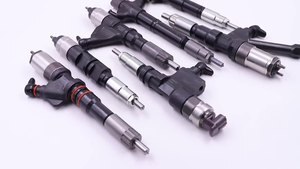
Images:
USD 186.8

[23-Nov-2022]
USD 129.99

[10-Nov-2022]
USD 129.99

[10-Nov-2022]
USD 129.99

[10-Nov-2022]
Scheme ###:

| 000. | [01] | 09500-05880 | INJECTOR ASSY | 23670-39095 |
| 000. | [01] | 09500-05881 | INJECTOR ASSY | 23670-39096 |
| 001. | [01] | 09500-05663 | INJECTOR ASSY | 23670-30050 |
| 002. | [01] | 09313-30720 | GASKET | 11176-30010 |
| 002. | [01] | 09313-30830 | GASKET | 11176-30011 |
Include in #3:
09500-05881
as INJECTOR ASSY
Cross reference number
| Part num | Firm num | Firm | Name |
| 09500-05881 | 23670-3909 | INJECTOR ASSY |
Information:
Start By:a. remove automatic timing advance unit
Keep all parts clean from contaminants. Contaminants put into the system may cause rapid wear and shortened component life.
Before any timing gears are removed, make sure "C" mark on the crankshaft gear is in alignment with "C" mark on the camshaft gear. 1. Remove bolts, plate (1) and fuel pump idler gear (2). 2. Remove bearing from idler gear (2) with tool (A). 3. Remove four bolts (3) and camshaft gear (4). 4. Remove bolts that are used to fasten shield (5) in position between the fuel pump and the exhaust manifold. Slide shield back from the timing cover plate.5. Remove the three nuts (6). 6. Remove six bolts (7). Remove the timing gear plate and the gasket. The following steps are to install the timing gears and plate.7. Clean the old gasket from the contact surfaces of the timing gear plate and cylinder block. Install a new gasket on the cylinder block. Cut the gasket even with the bottom face of the cylinder block.8. Be sure the O-ring seals are in position on the end of the fuel injection pump housing. Put the timing gear plate in position on the cylinder block and install the six bolts (7). Install nuts (6).
After the timing gear plate is installed, be sure the rack is free to move in the fuel injection pump housing. The O-ring seal on the drive end of the fuel injection pump housing can hold the rack and prevent free rack movement. Rack movement can be seen through hole in the timing gear plate just above where the fuel pump gear is mounted. If the rack does not move freely, remove the timing gear plate and check the O-ring seal on the drive end of the fuel injection pump housing. If the rack does not move freely, the engine can over speed and be damaged. Serious personal injury can be the result.
9. Install camshaft gear (4) with the "C" mark on the camshaft gear in alignment with the "C" mark on the crankshaft gear as shown in the illustration in the Specification section of this manual. Tighten the volts to a torque of 55 7 N m (41 5 lb ft).10. Use tooling (A) to install the bearing in idler gear (2). The end of the bearing must be 1.52 .025 mm (.060 .010 in) below the face of the gear hub.11. Be sure the oil hole in the shaft for gear (2) is open. Install idler gear (2). Put the plate on position with the finished side toward gear (2) and install the bolts.12. Install shield (5) and the four bolts.End By:a. install automatic timing advance unit
Perform Scheduled Oil Sampling on oil wetted compartments after performing service work to check for contaminants left in the system following repair. Contaminants put into the system may cause rapid wear and shortened component life.