Information injector assy

Rating:
Compare Prices: .
As an associate, we earn commssions on qualifying purchases through the links below

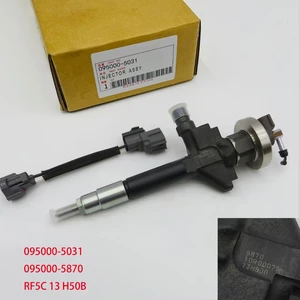
Diesel Common Rail Injector 095000-5030 095000-5031 095000-5870 Compatible With MAZDA M6 MPV RF5C13H50A
YJEMORLIX 🚗 Optimize engine performance, stop vehicle vibration, accelerate more smoothly. || 🚗 Super atomizing effect, high injection pressure, better atomizing effect, more full combustion. || 🚗 Promote smooth engine operation and balanced fuel delivery, reduce the overall fuel consumption. || 🚗 Atomized fuel into the engine intake manifold or cylinder, improve reliability and durability. || 🚗 Please confirm whether the nozzle is the same as your model before purchase.
YJEMORLIX 🚗 Optimize engine performance, stop vehicle vibration, accelerate more smoothly. || 🚗 Super atomizing effect, high injection pressure, better atomizing effect, more full combustion. || 🚗 Promote smooth engine operation and balanced fuel delivery, reduce the overall fuel consumption. || 🚗 Atomized fuel into the engine intake manifold or cylinder, improve reliability and durability. || 🚗 Please confirm whether the nozzle is the same as your model before purchase.

Seapple 1pcs Fuel Injector 095000-5031 0950005031 Compatible with Mazda M6 RF5C13H50A
Seapple Part Name: Fuel Injector || Part Number: 095000-5031 0950005031 Note: Please check the fitment carefully before purchase. Or just tell us the part number you need. || Applicable: Compatible with Mazda M6 RF5C13H50A || Package included: 1pcs Fuel Injector 095000-5031 0950005031 || Note: Please compare its appearance, shape and size with your original unit and make sure that it can fit your machine before ordering.
Seapple Part Name: Fuel Injector || Part Number: 095000-5031 0950005031 Note: Please check the fitment carefully before purchase. Or just tell us the part number you need. || Applicable: Compatible with Mazda M6 RF5C13H50A || Package included: 1pcs Fuel Injector 095000-5031 0950005031 || Note: Please compare its appearance, shape and size with your original unit and make sure that it can fit your machine before ordering.

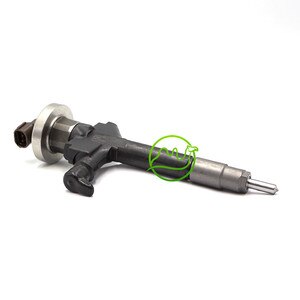
IMIFAFTAbT 095000-5030 095000-5031 095000-5870 095000-7850 095000-8830 1 PCS Fuel injector Fits for Mazda 6 2.0 DI 2002-2008 MPV 2.0 DI 1999-2006 RF5C
IMIFAFTAbT Product Name: 095000-5030 095000-5031 095000-5870 095000-7850 095000-8830 Fuel injector || Part number: 095000-5030 095000-5031 095000-5870 095000-7850 095000-8830 || Fits for Mazda 6 2.0 DI 2002-2008 MPV 2.0 DI 1999-2006 RF5C || 1 PCS Fuel injector || Note: Please confirm that the product shown in the part number is what you need. If you cannot confirm you can leave us a message and provide your engine serial number and nameplate
IMIFAFTAbT Product Name: 095000-5030 095000-5031 095000-5870 095000-7850 095000-8830 Fuel injector || Part number: 095000-5030 095000-5031 095000-5870 095000-7850 095000-8830 || Fits for Mazda 6 2.0 DI 2002-2008 MPV 2.0 DI 1999-2006 RF5C || 1 PCS Fuel injector || Note: Please confirm that the product shown in the part number is what you need. If you cannot confirm you can leave us a message and provide your engine serial number and nameplate
You can express buy:
USD 49
19-05-2025
19-05-2025
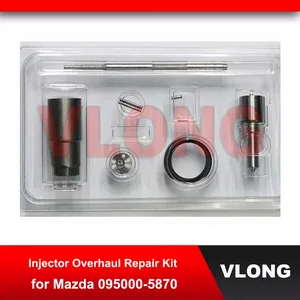
Diesel Injector Overhaul Kit For Mazda 6 MPV Injektor Repair Parts 095000-7850 095000-5031 095000-5870 RF5C13H50B RF5C-13-H50A
USD 202.02
13-05-2025
13-05-2025
New Common Rail Injector 095000-5870 , 095000-5031 , 095000-5030 , 095000-7850 , RF5C13H50A For Miazda 6/MPV
USD 476
07-10-2022
07-10-2022
Remanufactured quality Injector RF5C-13-H50B 095000-5031 RF5C13H50B
Images:
USD 299

[10-Nov-2022]
USD 245

[28-Jun-2019]
Components :
| 001. | INJECTOR ASSY | 09500-05031 |
| 001. | INJECTOR ASSY | 09500-05031 |
Scheme ###:
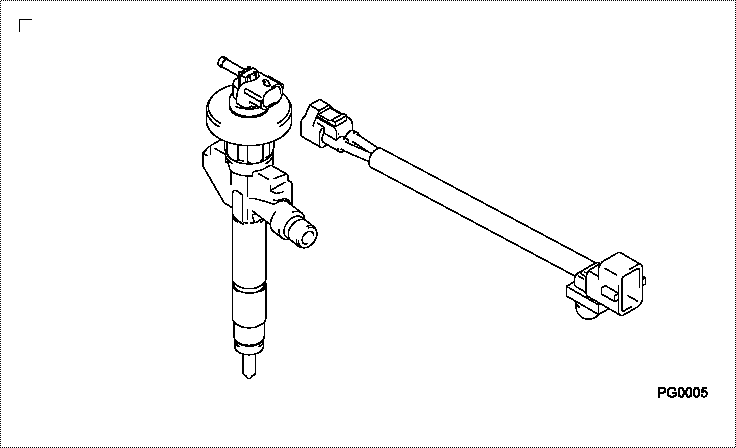
| 000. | [01] | 09500-05031 | INJECTOR ASSY | RF5C 13 H50A |
| 000. | [01] | 09500-05031 | INJECTOR ASSY | 16620HA30B |
| 000. | [01] | 09500-05031 | INJECTOR ASSY | 16620HA300 |
Include in #3:
Cross reference number
| Part num | Firm num | Firm | Name |
| 09500-05031 | MQ909954 | INJECTOR ASSY |
Information:
START BY:a. remove flywheel The crankshaft rear seal and wear sleeve come as a set and must be installed as a set. If a replacement of the seal is to be made, a replacement of the wear sleeve must also be made. 1. Make at least three holes in seal (1) with a hammer and a sharp punch. 2. Use tool (A) to remove seal (1). 3. Install tool (C) in the seal bore.4. Install tool (B) between tool (C) and wear sleeve (2). Turn tool (B) until the tool makes a dent (crease) in wear sleeve (2). Do this in three or more places until the wear sleeve is loose.5. Remove tools (B) and (C), and remove wear sleeve (2) from the crankshaft.Install Crankshaft Rear Seal And Wear Sleeve
The crankshaft seal and wear sleeve come as a set and must not be separated from each other at any time. Carefully read Special Instruction, Form No. SMHS8508, that is included with each seal and wear sleeve before any handling of the seal group is made.
1. Install the rear crankshaft seal and wear sleeve with tooling (A). Use the procedure which follows: a. Clean and make a preparation of the wear sleeve inside diameter and crankshaft outside diameter with 6V1541 Quick Cure Primer. Make an application of 9S3265 Retaining Compound to the crankshaft outside diameter before the wear sleeve is installed on the crankshaft. Do not let any Quick Cure Primer or Retaining Compound get on the lip of the seal.b. Install locator (1) and the bolts on crankshaft (3).c. The seal and wear sleeve must be installed dry. Make sure the seal is installed with the part number and the arrows showing crankshaft rotation toward the outside.
The front and rear seals and wear sleeves have different spiral grooves in the seal. Because of this type of design, the rear seal group for an engine is different from the front seal group. If a seal group is installed on the wrong side of the engine, oil can actually be taken out of the engine instead of moving the oil back into the engine.
d. Put wear sleeve (2) and seal (6) as a unit in position on locator (1).e. Put installer (4) in position on locator (1).f. Put clean engine oil on the face of nut (5) and its contact area on installer (4). Install nut (5) on locator (4).g. Tighten nut (5) until installer (4) makes contact with locator (1).h. Remove tooling (A) from the crankshaft seal and wear sleeve. Tooling (A) will install the seal and wear sleeve to the correct depth on the crankshaft.END BY:a. install flywheel