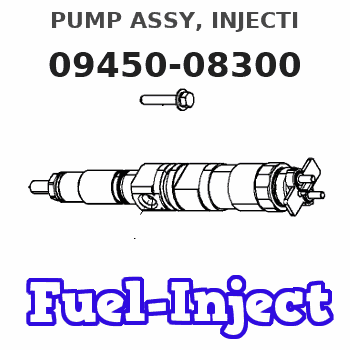
Information pump assy, injecti
Nozzle:
0935003840
Rating:
Components :
| 001. | PUMP ASSY, INJECTI | 09450-08300 |
Scheme ###:
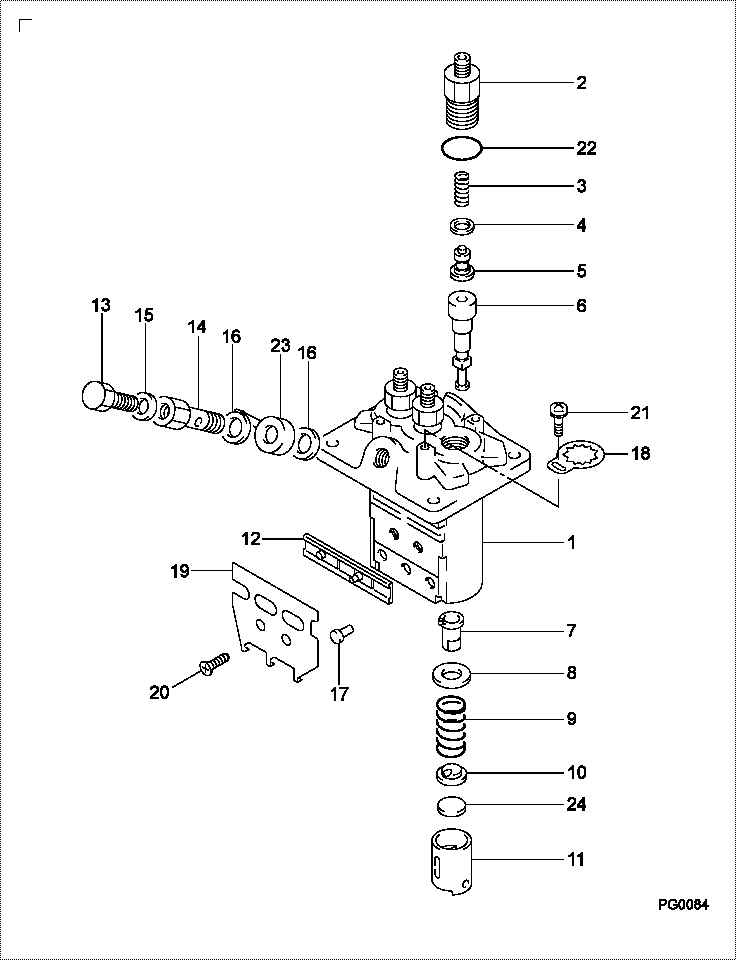
| 000. | [01] | 09450-08300 | PUMP ASSY, INJECTI | 30L6502800 |
| 001. | [01] | 09011-03730 | HOUSING SUB-ASSY, | |
| 002. | [03] | 09013-00390 | HOLDER SUB-ASSY, D | 47X0119800 |
| 003. | [03] | 09013-60530 | SPRING, DELIVERY V | |
| 004. | [03] | 09013-70130 | GASKET, DELIVERY V | |
| 005. | [03] | 09014-01900 | VALVE SUB-ASSY, IN | |
| 006. | [03] | 09015-04270 | ELEMENT SUB-ASSY, | |
| 007. | [03] | 09016-00140 | SLEEVE SUB-ASSY, C | |
| 008. | [03] | 09016-30140 | SEAT, SPRING, UPR | |
| 009. | [03] | 09016-40220 | SPRING, PUMP PLUNG | MM501926 |
| 010. | [03] | 09016-50170 | SEAT, SPRING, LWR | |
| 011. | [03] | 09017-00220 | TAPPET SUB-ASSY,IN | |
| 012. | [01] | 09021-00560 | RACK ASSY, CONTROL | |
| 013. | [01] | 09024-40010 | SCREW, AIR BLEEDER | 09024-40010 |
| 014. | [01] | 09024-50310 | SCREW, HOLLOW | |
| 015. | [01] | 09024-80010 | WASHER, DRAIN SCRE | 09024-80010 |
| 016. | [02] | 09025-10010 | WASHER, INJECTION | 85265-00077 |
| 017. | [03] | 09018-30090 | PIN, INJECTION PUM | |
| 018. | [03] | 09023-00070 | PLATE SET, VALVE H | |
| 019. | [01] | 09069-11020 | BRACKET, STOP WIRE | |
| 020. | [02] | 94900-20500 | SCREW, COUNTERSUNK | |
| 021. | [03] | 94900-75390 | SCREW, W/WASHER | |
| 022. | [03] | 90801-10130 | O-RING | |
| 022. | [03] | 09013-90400 | O-RING | 47X0122600 |
| 023. | [01] | 09221-70470 | NIPPLE, SWIVEL | |
| 024. | [3C] | 09031-10400 | PLATE, TAPPET ADJU | |
| 024. | [3C] | 09031-10410 | PLATE, TAPPET ADJU | |
| 024. | [3C] | 09031-10420 | PLATE, TAPPET ADJU | |
| 024. | [3C] | 09031-10430 | PLATE, TAPPET ADJU | |
| 024. | [3C] | 09031-10440 | PLATE, TAPPET ADJU | |
| 024. | [3C] | 09031-10390 | PLATE, TAPPET ADJU | |
| 024. | [3C] | 09031-10380 | PLATE, TAPPET ADJU | |
| 024. | [3C] | 09031-10370 | PLATE, TAPPET ADJU | |
| 024. | [3C] | 09031-10360 | PLATE, TAPPET ADJU | |
| 024. | [3C] | 09031-10350 | PLATE, TAPPET ADJU | |
| 024. | [3C] | 09031-10340 | PLATE, TAPPET ADJU | |
| 024. | [3C] | 09031-10330 | PLATE, TAPPET ADJU | |
| 024. | [3C] | 09031-10320 | PLATE, TAPPET ADJU | |
| 024. | [3C] | 09031-10450 | PLATE, TAPPET ADJU |
Include in #3:
09450-08300
as PUMP ASSY, INJECTI
Cross reference number
| Part num | Firm num | Firm | Name |
| 09450-08300 | 30L6502800 | PUMP ASSY, INJECTI | |
| 30L6502800 | MITSUBISHI | PUMP ASSY, INJECTI |
Information:
The LUBRICATION AND MAINTENANCE CHART lists all serviceable items commonly ordered on this engine.The maintenance time intervals are expressed in Service Meter Units. The Service Meter on the engine shows the total number of units the engine has run. Use the Service Meter readings for determining your maintenance schedules. Perform the maintenance at multiple intervals of the units shown. For example, when the Service Meter shows "100" on the dial, all items listed under "EVERY 10 SERVICE METER UNITS" should be serviced now for the tenth time, and all items under "EVERY 50 SERVICE METER UNITS" should be serviced for the second time.Diesel fuels, lubricants and coolant make-up water to use are explained in the "Specifications". NOTE A: The percentage of sulfur in the fuel will affect the engine oil recommendations. If the fuel has over 0.5% sulfur content, the CD engine oil must have a TBN of 20 times the percentage of fuel sulfur (TBN as measured by the ASTM D-2896 method). If the sulfur content is greater than 1.5% by weight, use an oil with a TBN of 30 and reduce the oil change interval by one half. Consult your Caterpillar dealer for correct engine oil recommendations.NOTE B: Check fuel pressure gauge daily. Replace when FUEL PRESSURE gauge registers OUT or 20 PSI (124 kPa).NOTE C: The element can be cleaned approximately 3 times. Carefully inspect the element after each cleaning. If engine is not equipped with air cleaner service indicator, check element every 250 Service Meter Units, or more often under dusty conditions. If after servicing the air cleaner, the exhaust smoke and/or loss of power continues, install a new element.NOTE D: Authorized Caterpillar dealers are equipped with the necessary tools, personnel and procedures to perform these services.NOTE E: Initial valve lash adjustment on new, rebuilt or remanufactured engines is recommended at the first scheduled oil change interval, due to initial wear and seating of valve train components. Subsequent adjustments should be made at every 2000 Service Meter Units or One year, Whichever Occurs First.Lubrication Instructions
Crankcase Lubrication Oil
The Lubrication and Maintenance Charts list the normal oil change periods as determined by fuel sulphur content. (Make an initial oil and filter change after the first 10 service meter units of operation for reconditioned engines).See the OIL SPECIFICATIONS to aid in the proper oil SAE viscosity selection. The proper SAE viscosity of oil to select is determined by the ambient temperature at which the engine is started and operated.Checking Oil Level
The dipstick is stamped on both sides of the blade. One side is marked and to be read when checking the oil level with the ENGINE STOPPED. The other side is marked and to be read with the ENGINE IDLING-HOT OIL. Each side is stamped to remind you not to OVERFILL the crankcase with oil.
Be sure to read the correct side of the dipstick. The ADD and FULL levels are not the same when checking the oil while stopped or while idling.
Checking Oil Pressure
Immediately after starting,