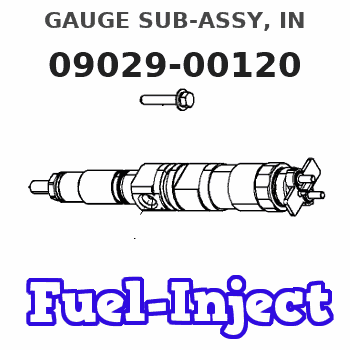
Information gauge sub-assy, in
Rating:
Include in #3:
Cross reference number
| Part num | Firm num | Firm | Name |
| 09029-00120 | 09029-0015 | GAUGE SUB-ASSY, IN | |
| 09029-00150 | KOMATSU | GAUGE SUB-ASSY, IN |
Information:
Step 1. Install The Timing Adapter GroupA. Turn the engine off at the ignition switch.
Magnetic Pick-up Sensor
(1) Magnetic pick-up sensor. (2) Adapter sleeve for magnetic pick-up.
Timing Adapter Module Installed On ECAP
(3) ECAP. (4) Timing adapter module. (5) Cable for magnetic pick-up.B. Install the 8C9995 Module Adapter Plate on the ECAP. Install timing adapter module to the module adapter plate. Connect cable for the magnetic pick-up to the timing adapter module.C. Use the Turning Tool to put either #1 or #6 piston at top-dead-center on the compression stroke.
Electronic Control System Components
(6) Port for timing calibration probe. (7) Speed/Timing Sensor.D. Remove the Timing Calibration Plug from the right side of the cylinder block (on the #4 cylinder rod pocket) and install the Timing Probe Adapter Sleeve into the hole.
Installed Magnetic Pick-up Sensor
(1) Magnetic pick-up sensor. (2) Adapter sleeve for magnetic pick-up. (8) Counterweight. (9) TDC slot. (A) 1.0 mm (.040 in).E. Rotate the engine until #1 cylinder is between 10 and 90 degrees before-top-dead-center (BTDC). This positions the counterweight surface in front of the timing calibration hole. The counterweight must be a minimum of 10 degrees BTDC to make sure the timing probe is positioned on counterweight surface and not TDC slot.
If the crankshaft is not in the correct position when the magnetic pickup sensor is installed, the magnetic probe will be damaged when the engine is started.
F. Put a 2D6392 O-Ring Seal on the end of the Magnetic Pick-up Sensor (a small amount of clean engine oil will let the seal slide onto the sensor more easily).G. Push the sensor through the adapter until it comes in contact with the counterweight and move the O-Ring Seal down against the adapter.H. Withdraw the sensor 1 mm (.04 in.) and hand tighten the nut on the adapter sleeve to firmly hold the timing probe in position.I. Connect cable for magnetic pick-up to the magnetic pick-up sensor. Step 2. Install ECAP And Injector HarnessA. Connect an ECAP to the Engine Data Link Connector (J8).B. Install the Injection "T" Harness on the Fuel Injector Connector (J5/P5) in the valve cover base.C. Be certain all connections (probe, harness, ECAP) are made correctly. Use special care when connecting "T" Harness to J5. The plug can be mis-aligned. Also use care when reconnecting J5 and P5. Incorrect installation will result in a "No Start" condition. Step 3. Calibrate Speed/Timing SensorA. Start the engine and run at low idle until the engine has warmed up enough to change out of Cold Mode operation. The "Diagnostic Lamp" should go out after the engine has started and the 10 second lamp test is complete. The engine rpm will decrease from approximately 1000 rpm while in the cold mode to the programmed low idle rpm when out of Cold Mode.B. Check for ACTIVE Diagnostic Codes. Use the procedures in this manual to troubleshoot and repair any ACTIVE Diagnostic Codes before attempting a calibration check.C. After engine has shifted out of Cold Mode, select the 3176 Timing Calibrate Screen on