Information adjusting device
BOSCH
9 421 614 607
9421614607
ZEXEL
159600-1321
1596001321

Rating:
Scheme ###:
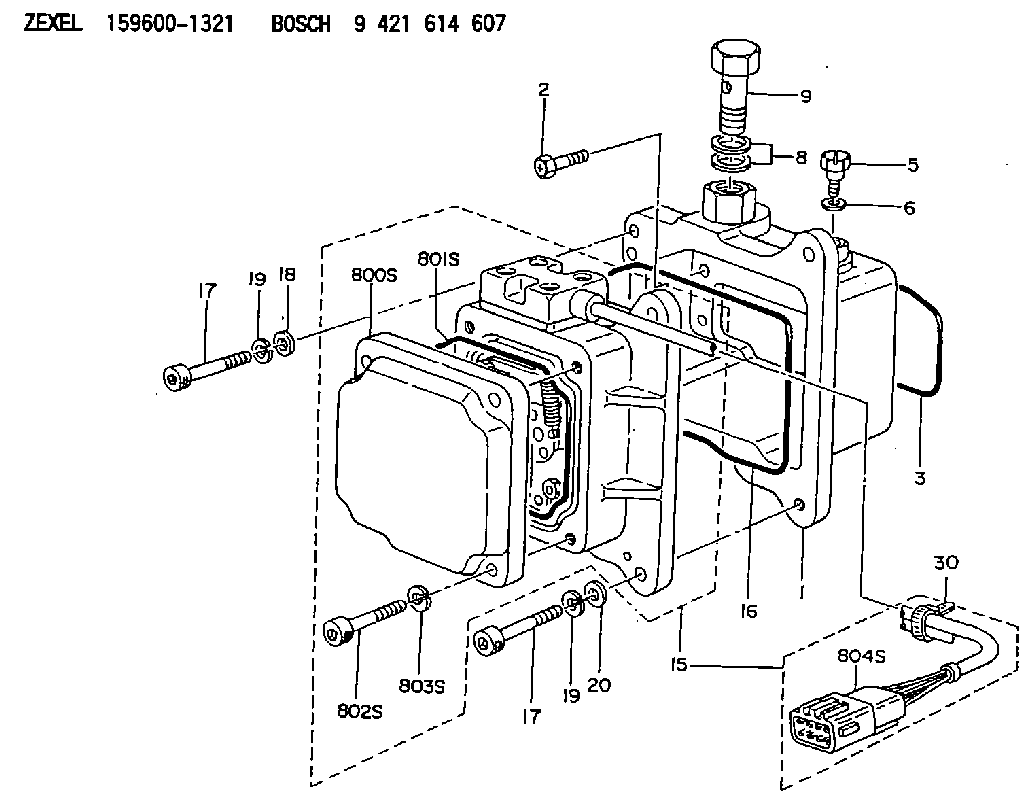
| 1. | [1] | 159598-2321 | DIAPHRAGM HOUSING |
| 2. | [4] | 159596-2800 | BLEEDER SCREW |
| 3. | [1] | 159595-9800 | SEAL RING |
| 5. | [1] | 131420-0400 | BLEEDER SCREW |
| 6. | [1] | 026506-1040 | GASKET D9.9&6.2T1 |
| 8. | [2] | 139514-0300 | GASKET |
| 9. | [1] | 029731-4680 | EYE BOLT |
| 15. | [1] | 159604-2721 | ACTUATOR |
| 16. | [1] | 159596-5800 | SEAL RING |
| 17. | [4] | 010206-3040 | HEX-SOCKET-HEAD CAP SCREW M6P1L30 |
| 17. | [4] | 010206-3040 | HEX-SOCKET-HEAD CAP SCREW M6P1L30 |
| 18. | [1] | 139306-0400 | PLAIN WASHER |
| 19. | [4] | 029320-6010 | LOCKING WASHER |
| 19. | [4] | 029320-6010 | LOCKING WASHER |
| 20. | [3] | 159595-5700 | PLAIN WASHER |
| 30. | [1] | 159911-1100 | CLAMPING BAND |
| 800S. | [1] | 159595-8801 | COVER |
| 801S. | [1] | 159596-1400 | SEAL RING |
| 802S. | [4] | 010206-3040 | HEX-SOCKET-HEAD CAP SCREW M6P1L30 |
| 803S. | [4] | 029320-6010 | LOCKING WASHER |
| 804S. | [1] | 159911-4500 | PLUG HOUSING |
Include in #1:
108822-3032
as _
Cross reference number
Zexel num
Bosch num
Firm num
Name
Information:
Start By:a. remove engine balancer group (3114 Engines)b. remove oil pump (3116 Engines) 1. Remove bolts (1), the washers and bearing cap (2). Remove the lower main bearing half from the cap.
If the crankshaft is turned in the wrong direction during upper main bearing half removal, the tab of the bearing will be pushed between the crankshaft and the cylinder block. This can cause result in damage to either or both the crankshaft and the cylinder block.
Both the center and two end main journals have no oil hole. To remove these upper main bearing halves, put a thin piece of soft material, (that will not damage the crankshaft journal), against the end of the bearing half, opposite the tab. Hit the bearing with the soft material until the tab of the bearing is free from the groove in the cylinder block.2. Remove the upper half of the main bearings as follows: a. Turn the crankshaft until Tool (A) can be installed in the crankshaft journal. Install Tool (A) as shown.b. Turn the crankshaft in the direction which will push the upper main bearing half out, tab end first.c. Check the condition of the main bearings. Refer to "Guideline For Reusable Parts, Main & Connecting Rod Bearings", Form No. SEBF8009 and SEBD0531 as guide for checking bearing condition. The following steps are for the installation of the crankshaft main bearings.3. Clean the bearing surfaces in the cylinder block for the main bearings. Apply clean engine oil on the upper main bearing half. Do not put oil on the back side of the bearing. Using Tool (A), install the upper main bearing half (bearings with the oil holes) in the cylinder block. Be sure the tab on the back side of the bearing engages with the groove in the cylinder block.4. Clean the bearing surface of the main bearing caps. Install the lower main bearing half in the main bearing cap. Be sure the tab on the back side of the bearing engages with the groove in the main bearing cap. Apply clean engine oil on the lower main bearing half. Do no put oil on the back side of the bearing.5. Install the main bearing caps as follows:
Install the main bearing caps with the sequence number to the right, 1 through 5 (for the 4 cylinder) and 1 through 7 (for the 6 cylinder), front to rear.
a. Put main bearing caps (2) in position in the cylinder block with the sequence numbers in the correct positions.b. Apply clean engine oil to the threads of the main bearing cap mounting bolts and on the washer contact faces.c. Install main bearing cap mounting bolts (1) and the washers. Tighten both bolts of each main bearing cap to a torque of 54 7 N m (40 5 lb ft).d. Tighten the bolts and additional 1/4 90 5 degrees ( turn). 6. Check the end play of the crankshaft with Tool (B). The end play of the crankshaft